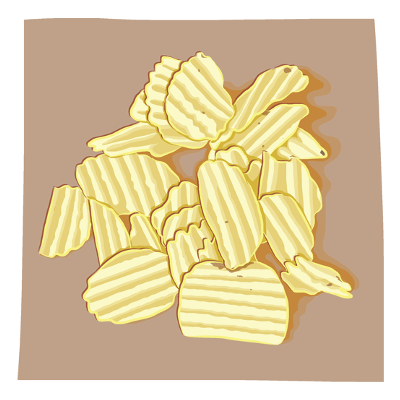
Here is the work table today with several bits and pieces in the works for several assemblage pieces. Stay tuned to see what happens.
A mess of bits and pieces being worked on.
Here is the work table today with several bits and pieces in the works for several assemblage pieces. Stay tuned to see what happens.

A mess of bits and pieces being worked on.
I cut some hands out of card stock with a Cricut machine. Well actually my daughter cut them for me with her Cricut machine. I then laminate them together in groups of six with thinned wood glue to make thicker and sturdy hands that will painted and used in some assemblage pieces.

Tiny hands cut from card stock. They are based on one of my own hands.

Three lamented tiny hands.
When I first started out working with digital art in 2013 I had a small iPad and a Galaxy tablet. Loaded on the iPad was an Adobe app called “Ideas”. It was a lot of fun to work with. Then I got rid of the only iPad I have ever owned and kept the Galaxy tablet which unfortunately didn’t have the “Ideas” app installed. As it turned out sometime later Adobe discontinued the “Ideas” app. These are a few of the drawings I did with it.
I did a show and lecture at BYU Idaho some years ago. Although I didn’t sell anything (not that I expected to) it was a marginal success and gave me a change of pace. The big pieces in this picture of the show in the gallery are from the Cayucos Lattice series of laser cut and painted abstracts. I had showed these at one of the Salt Lake City libraries a year or two before this show. I had hoped to show them at the main branch of the library but they had me show in one of the branches up in the Avenues and during a time of year when there wasn’t very much traffic. The majority of people who attended the opening were my own family and I think there was only one or two others who came. You win some and you loose some.

I took this picture of Holister Peak between San Luis Obispo and Morro Bay, California. I wanted to try out the Inpainting Tool in Affinity Photo so I could clean the picture up some. I took the image with my phone while my wife was driving. Here are the final and before clean up images.

Holister Peak is one of the Nine Sisters and series of nine volcanoes that run from San Luis Obispo to Morro Bay, San Luis Obispo County, California.

The image before cropping and removing the poles, power lines, and fence and making the colors brighter and richer. The Inpainting Tool was a pleasure to use and did a rather nice job.
I played around with some tilt shift effects in Affinity Photo with an image I took on a camping trip with my brother Kent to Bryce Canyon in July of 2020. This picture was taken on an outing to Mossy Cave Trail, Tropic, Utah. It's not the best image to play around with the effect but here is what I ended up with anyway.

The waterfall at the end of the Mossy Cave Trail helping people cool off even though that day wasn’t a very hot day. The photo was probably taken with the camera in my OnePlus 7 phone which was not a bad camera as mobile phones go. The Affinity Photo app on my Windows Surface Book 3 laptop was used to meddle with the image.
Another digital Point Buchon Trail picture. I started it last year in 2023 and I’m picked back up on it this in April of 2024 and this is where it is so far.

I make my titles using Affinity Designer. I compose everything so they are right reading then I make copies of everything and flip them backwards. When I am ready to use one I cut it out and paint the printed side with paint and place it wet paint side down to what ever surface I am adhering it to and burnish it so all of it sticks to the surface. Before I add the paint I mark the back of the piece with an up arrow so I make sure it isn’t upside down when it is adhered to the surface. When it is completely dry I wet the paper with water and carefully rub all of the paper away revealing the right reading text.


Backward title text just about ready for some paint.

The back side of the title strip with an arrow pointing up to make sure the strip isn't positioned upside down. If you look carefully above the arrow you can see a little cut to indicate where the center of the title is. I draw the arrow at this center point to help see it better.

The title strip has been painted and applied to the bottom of the frame. I usually add the title to a piece when it has been completed. After the paint has dried thoroughly I will the layer of paper.

Here is how it turned out with the paper rubbed off. To see the full image go to the recent work gallery page.
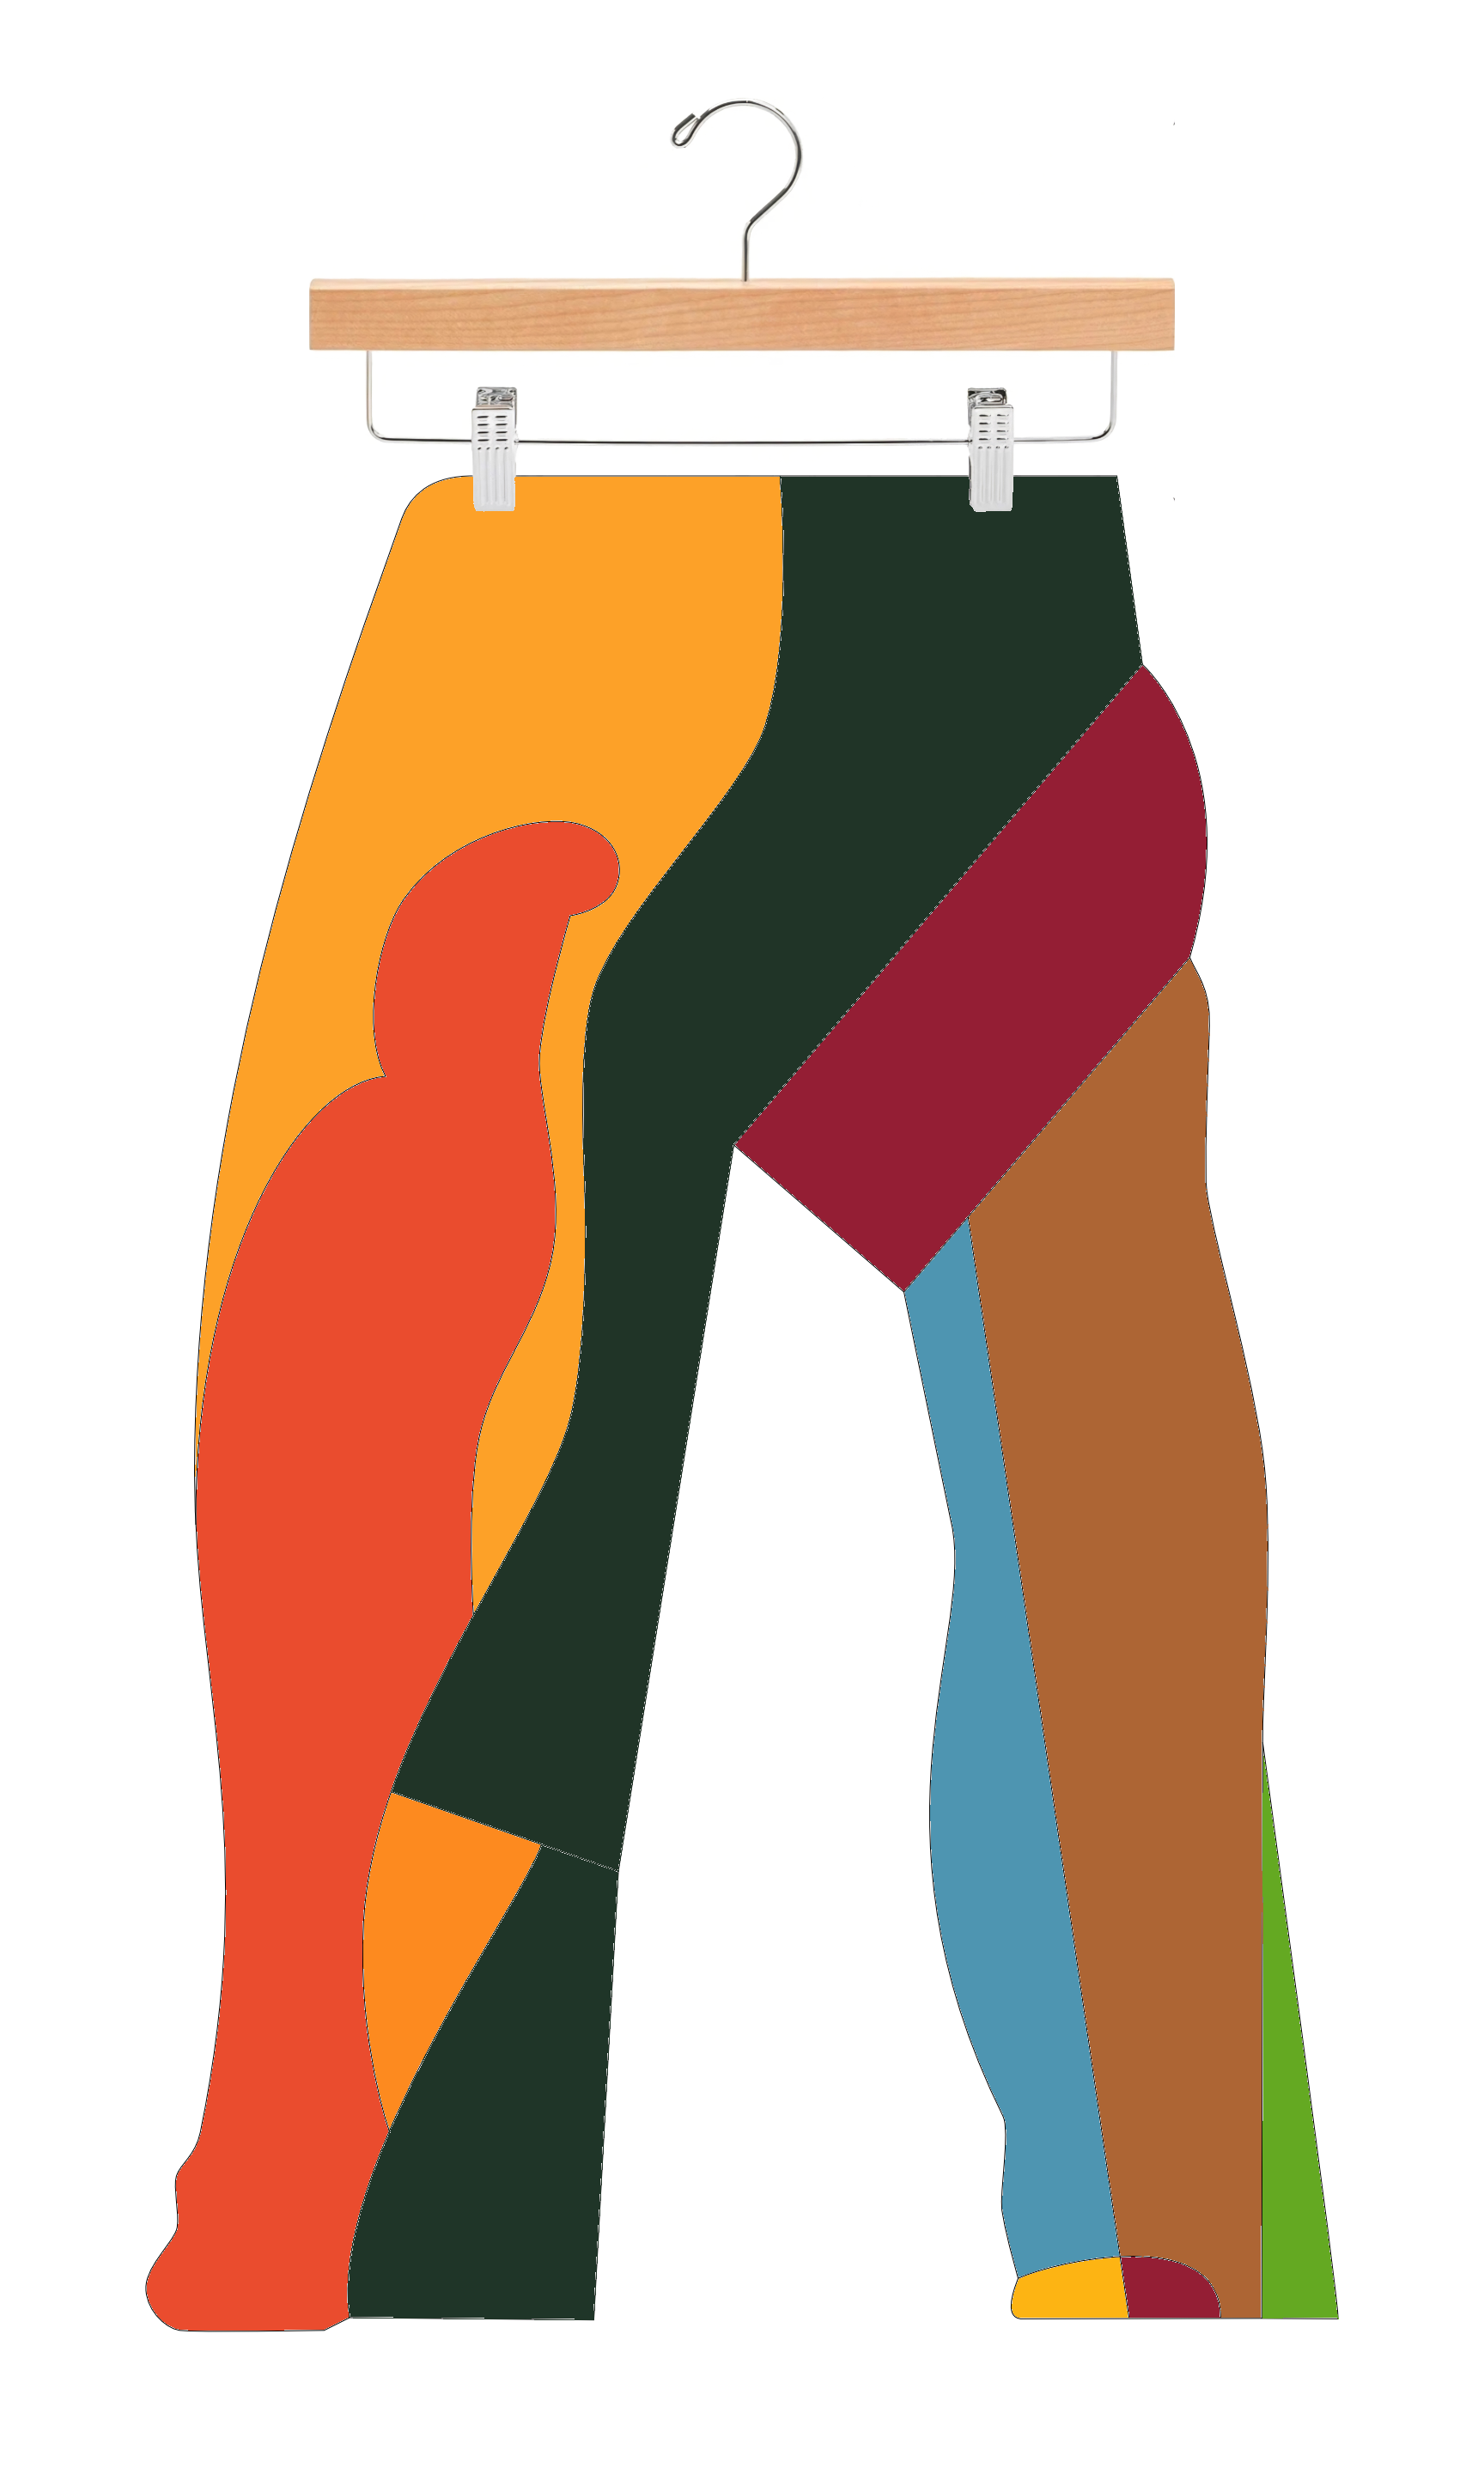
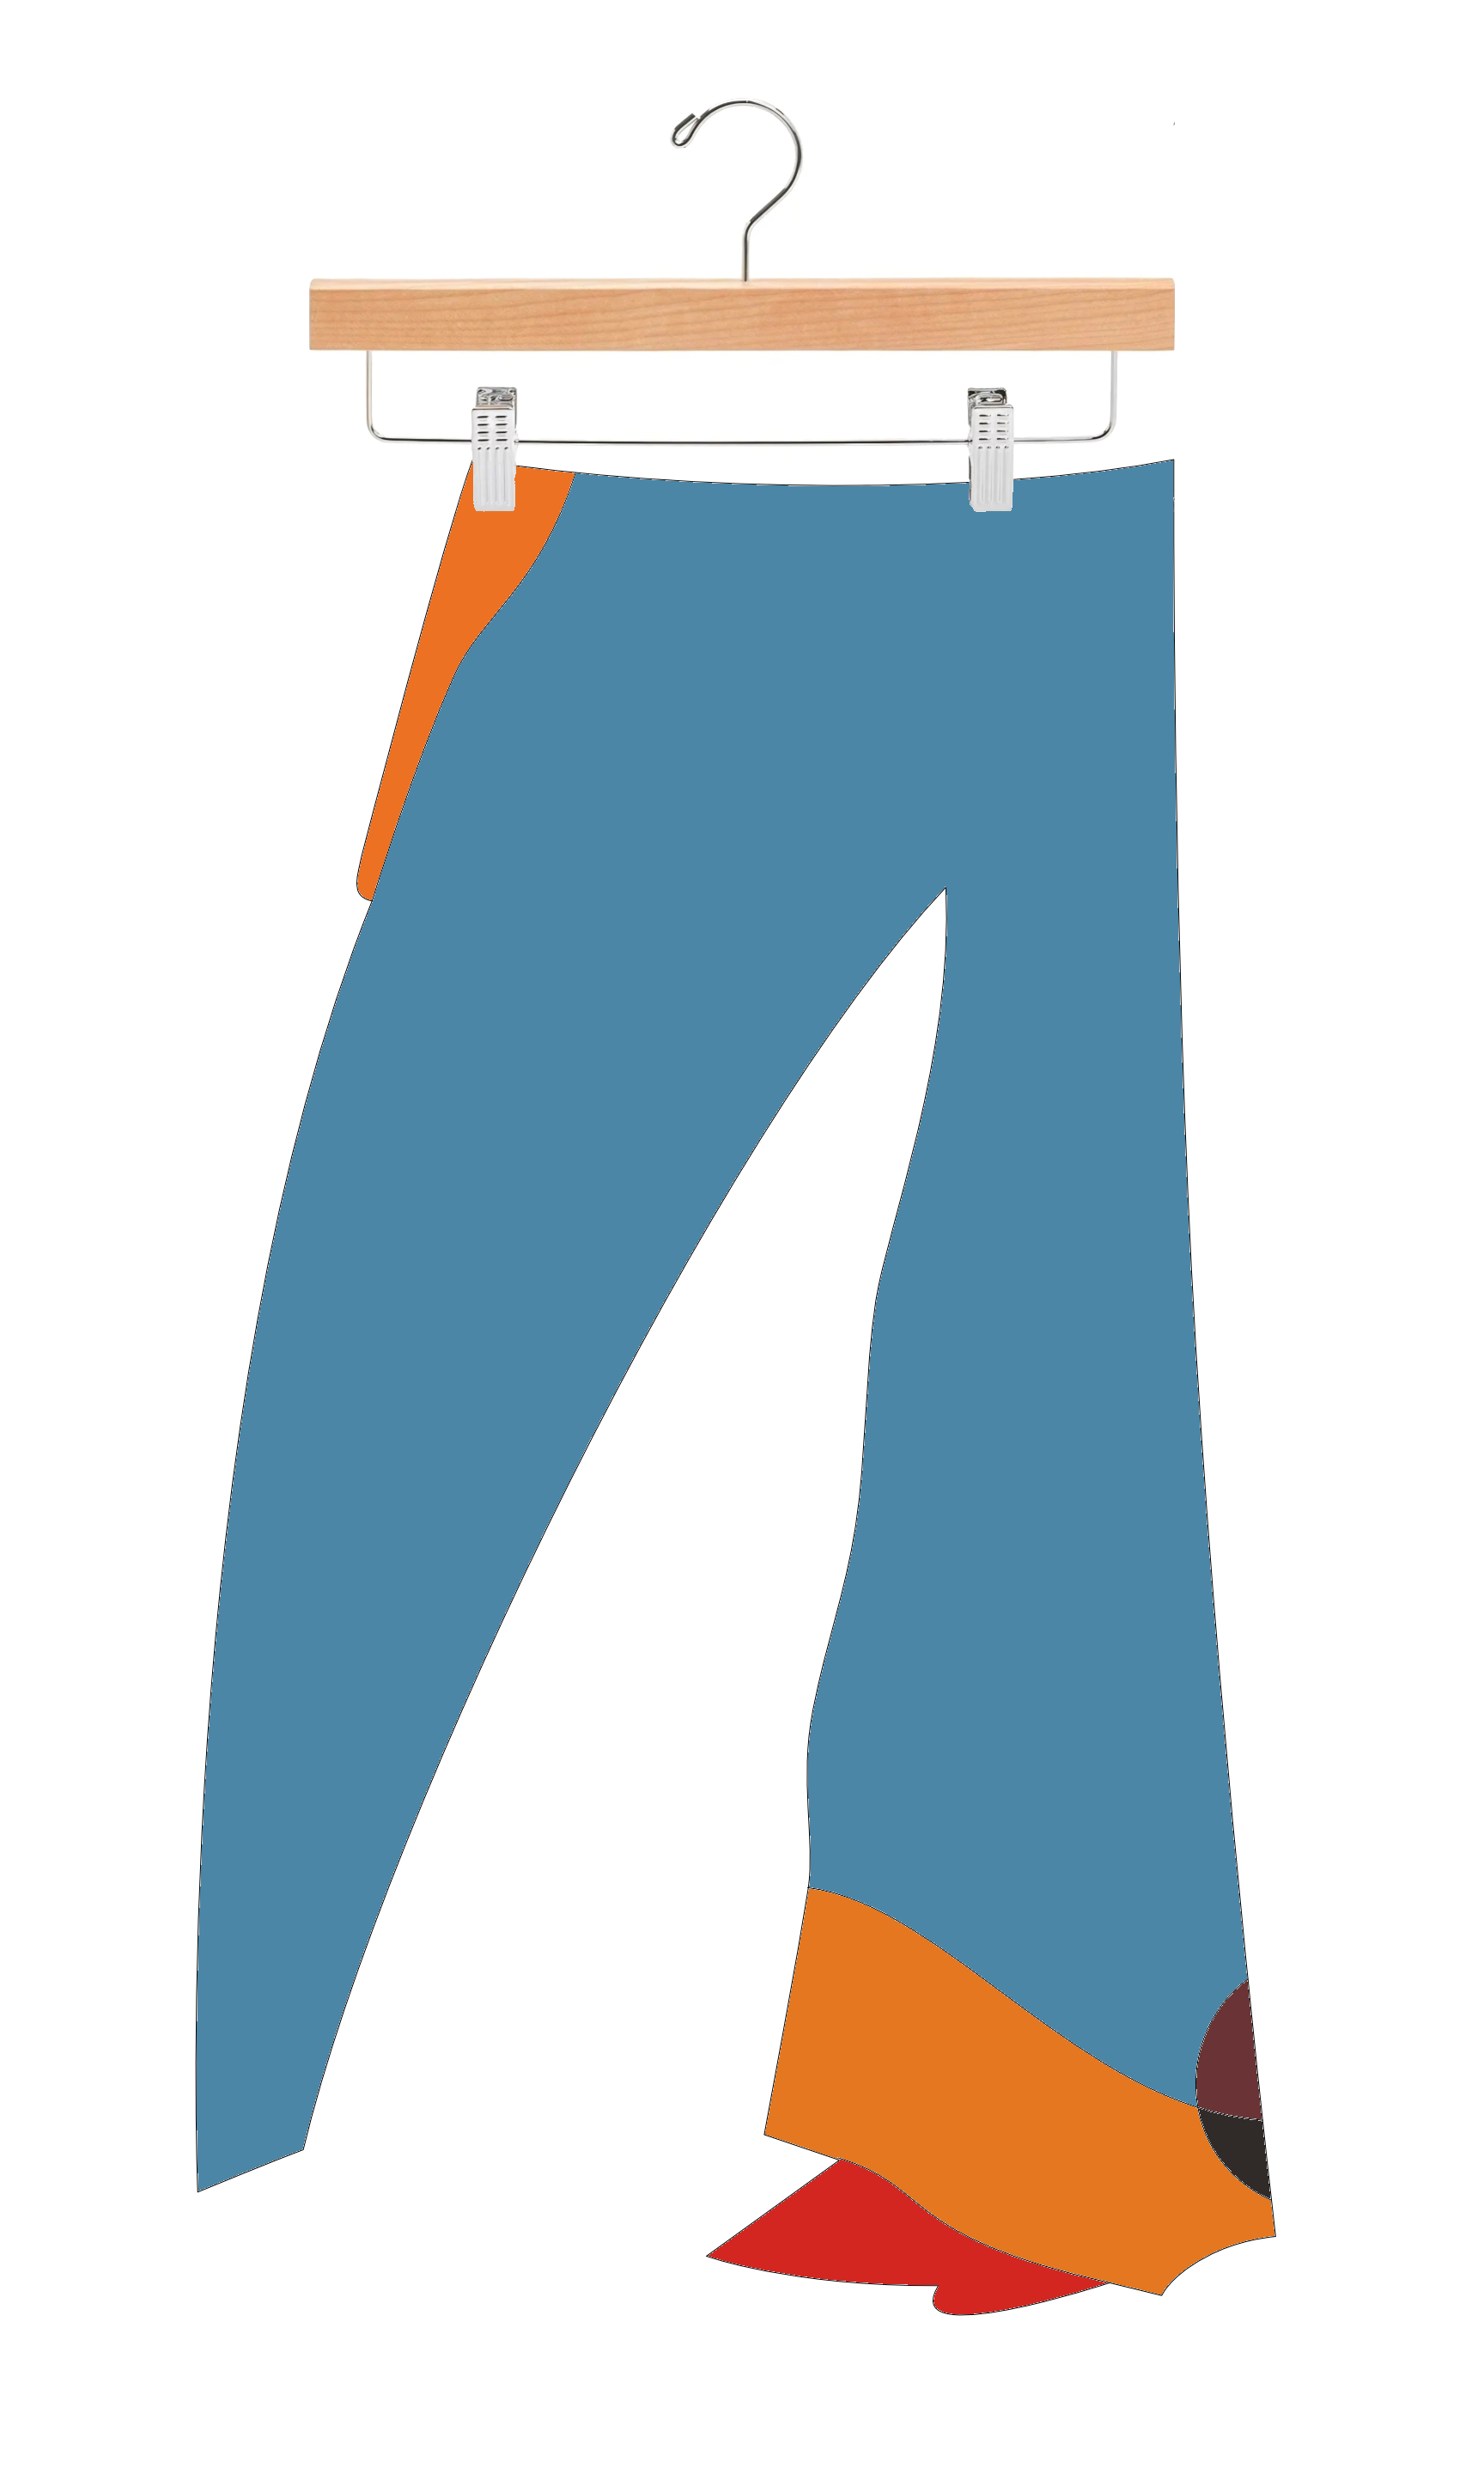
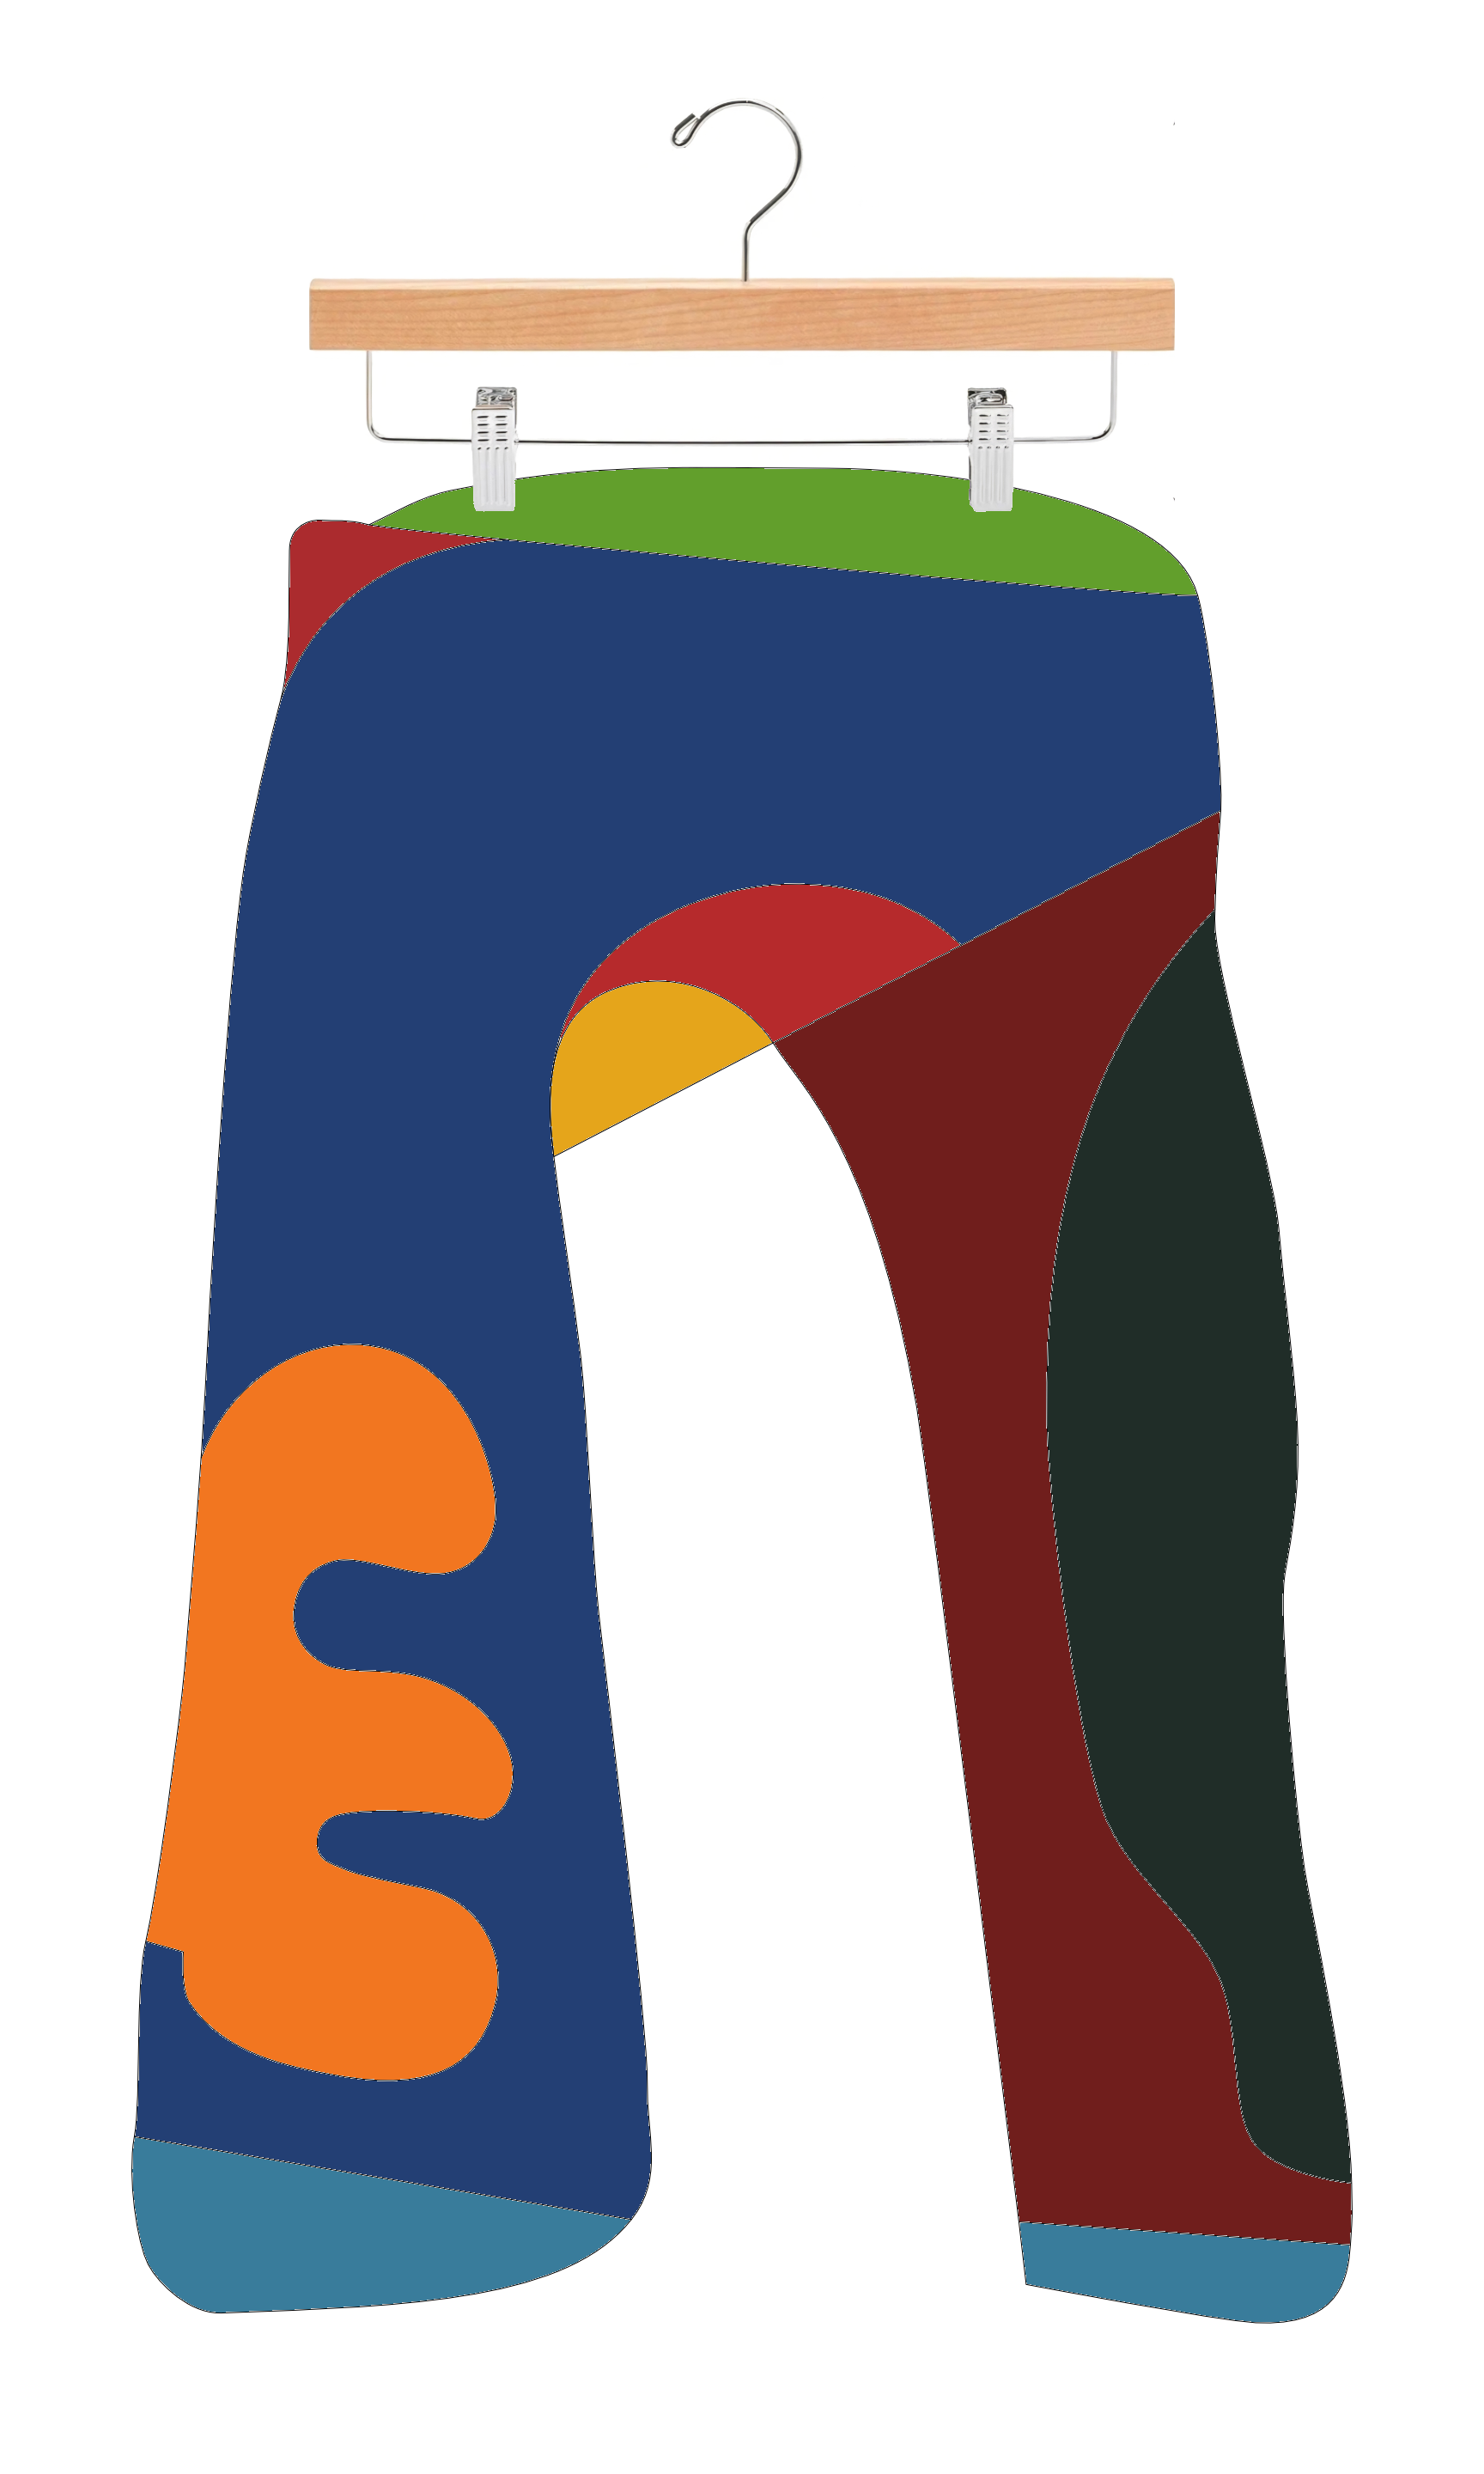
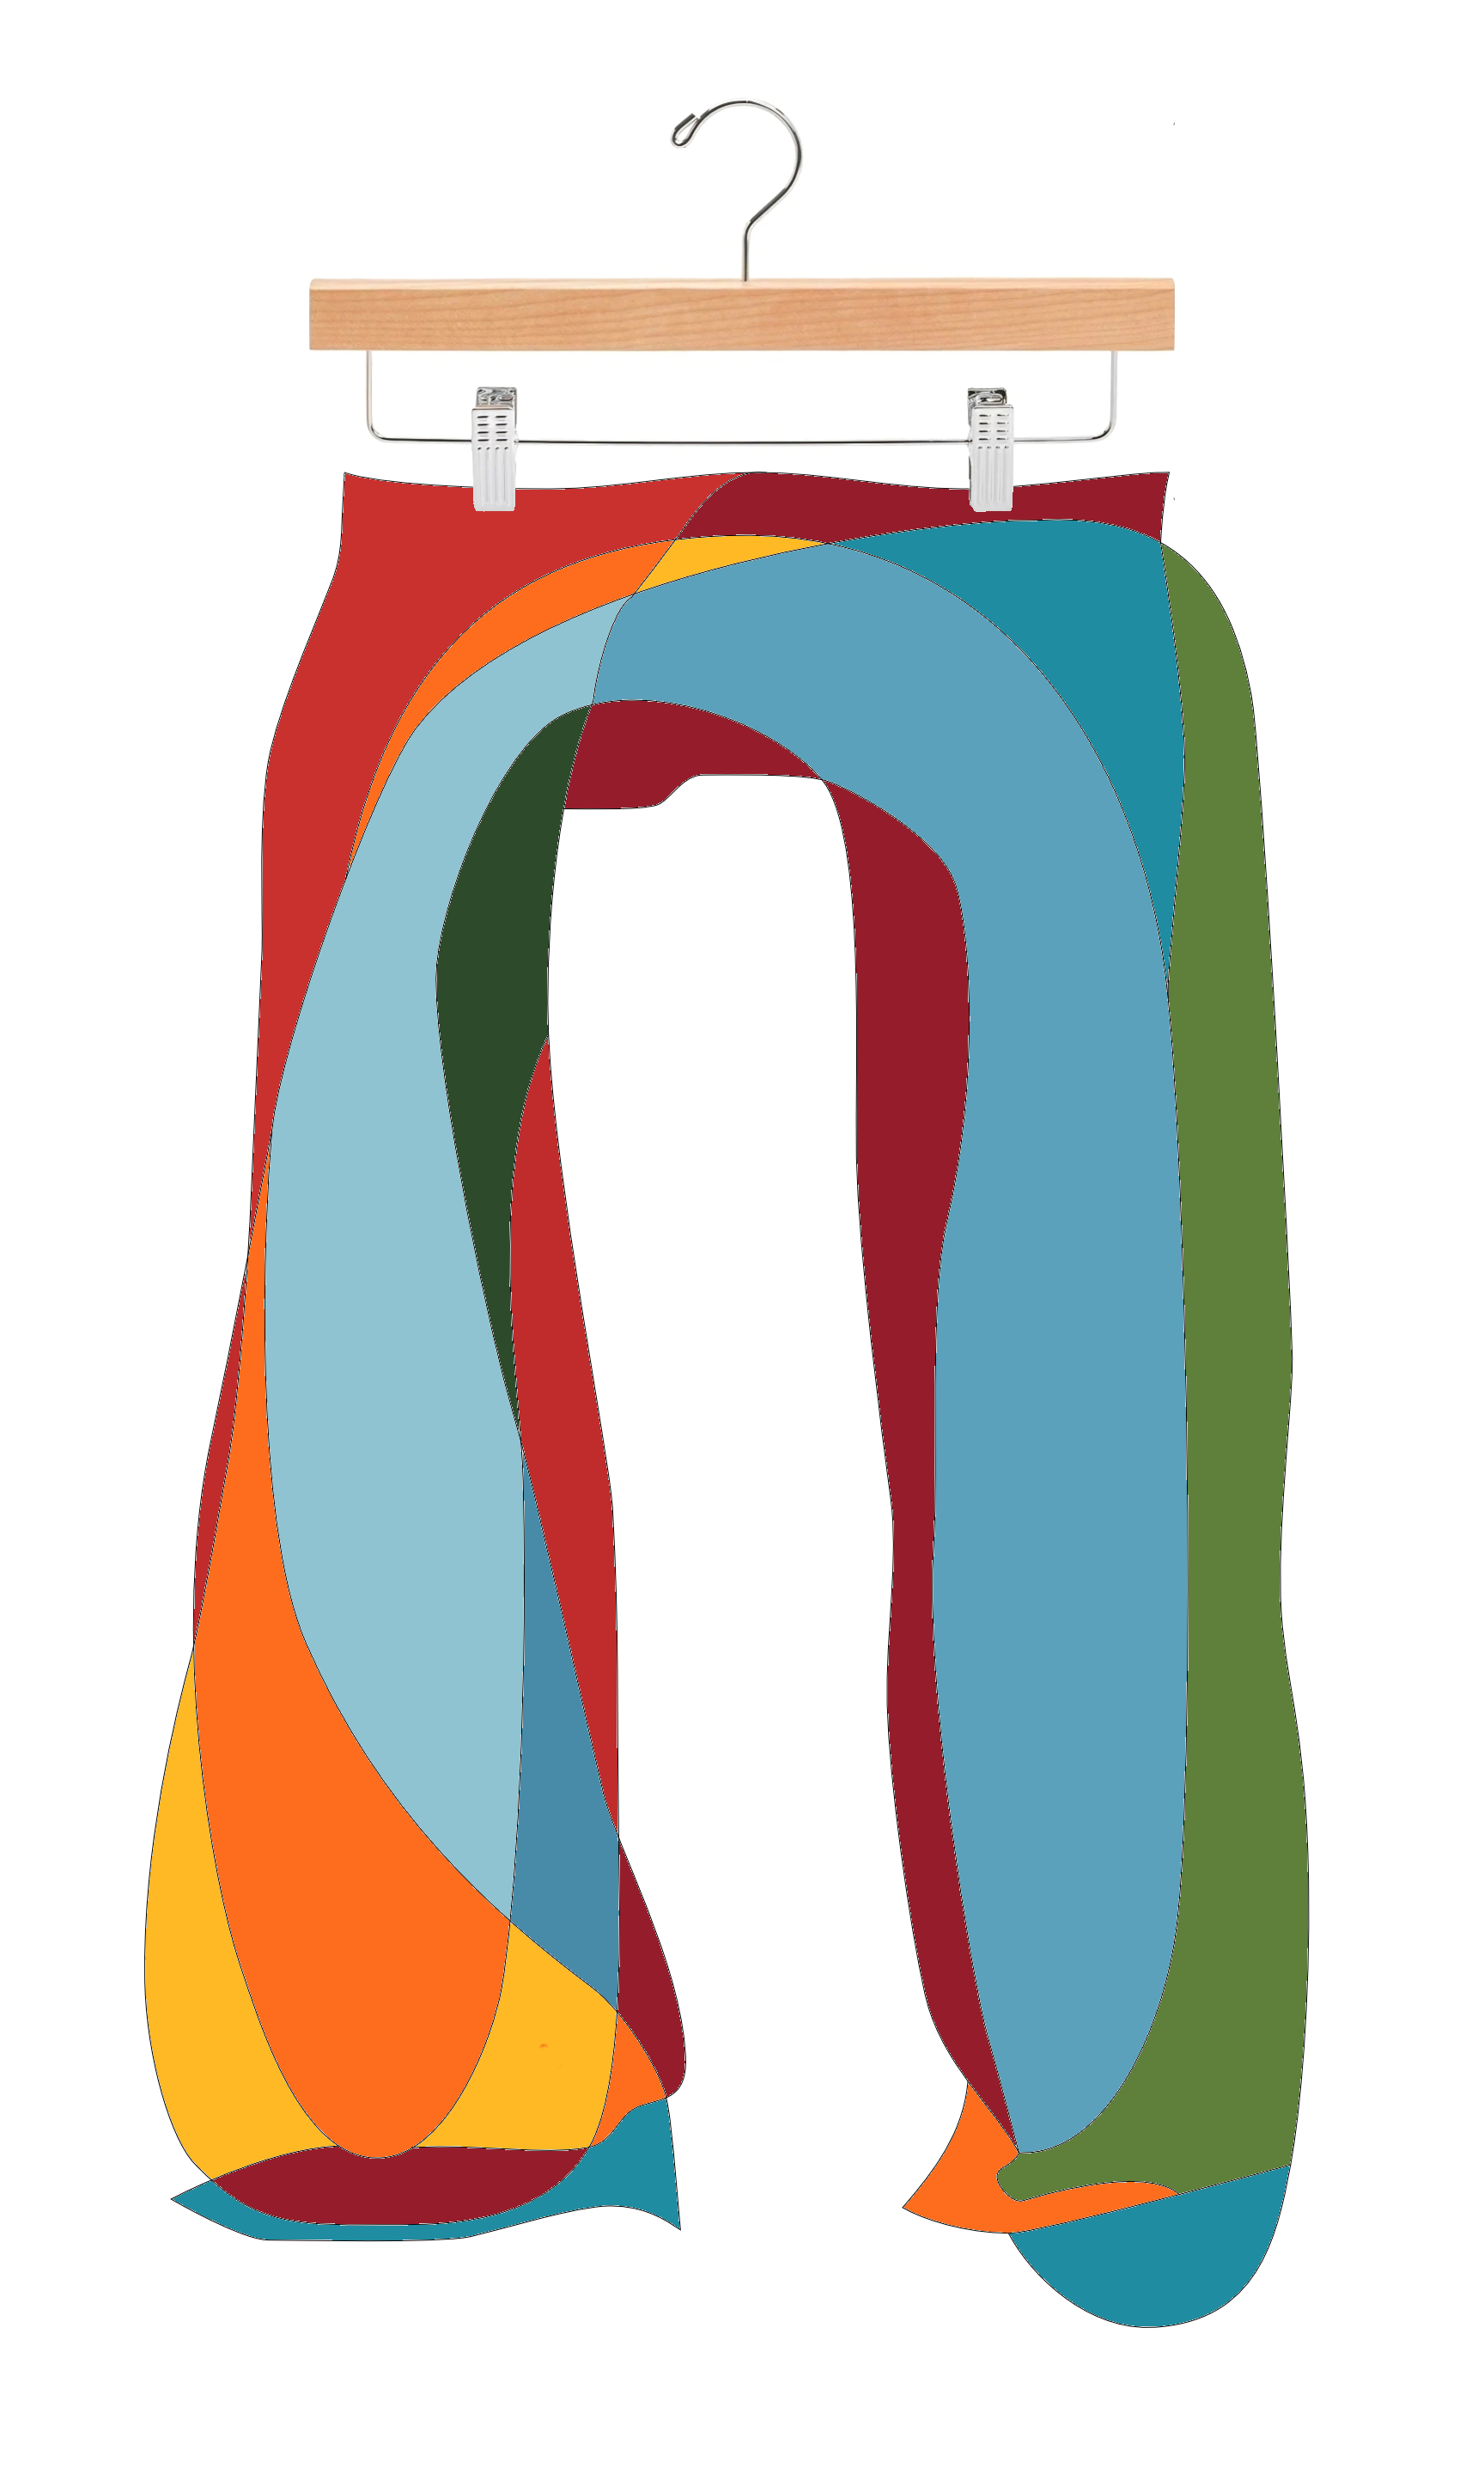
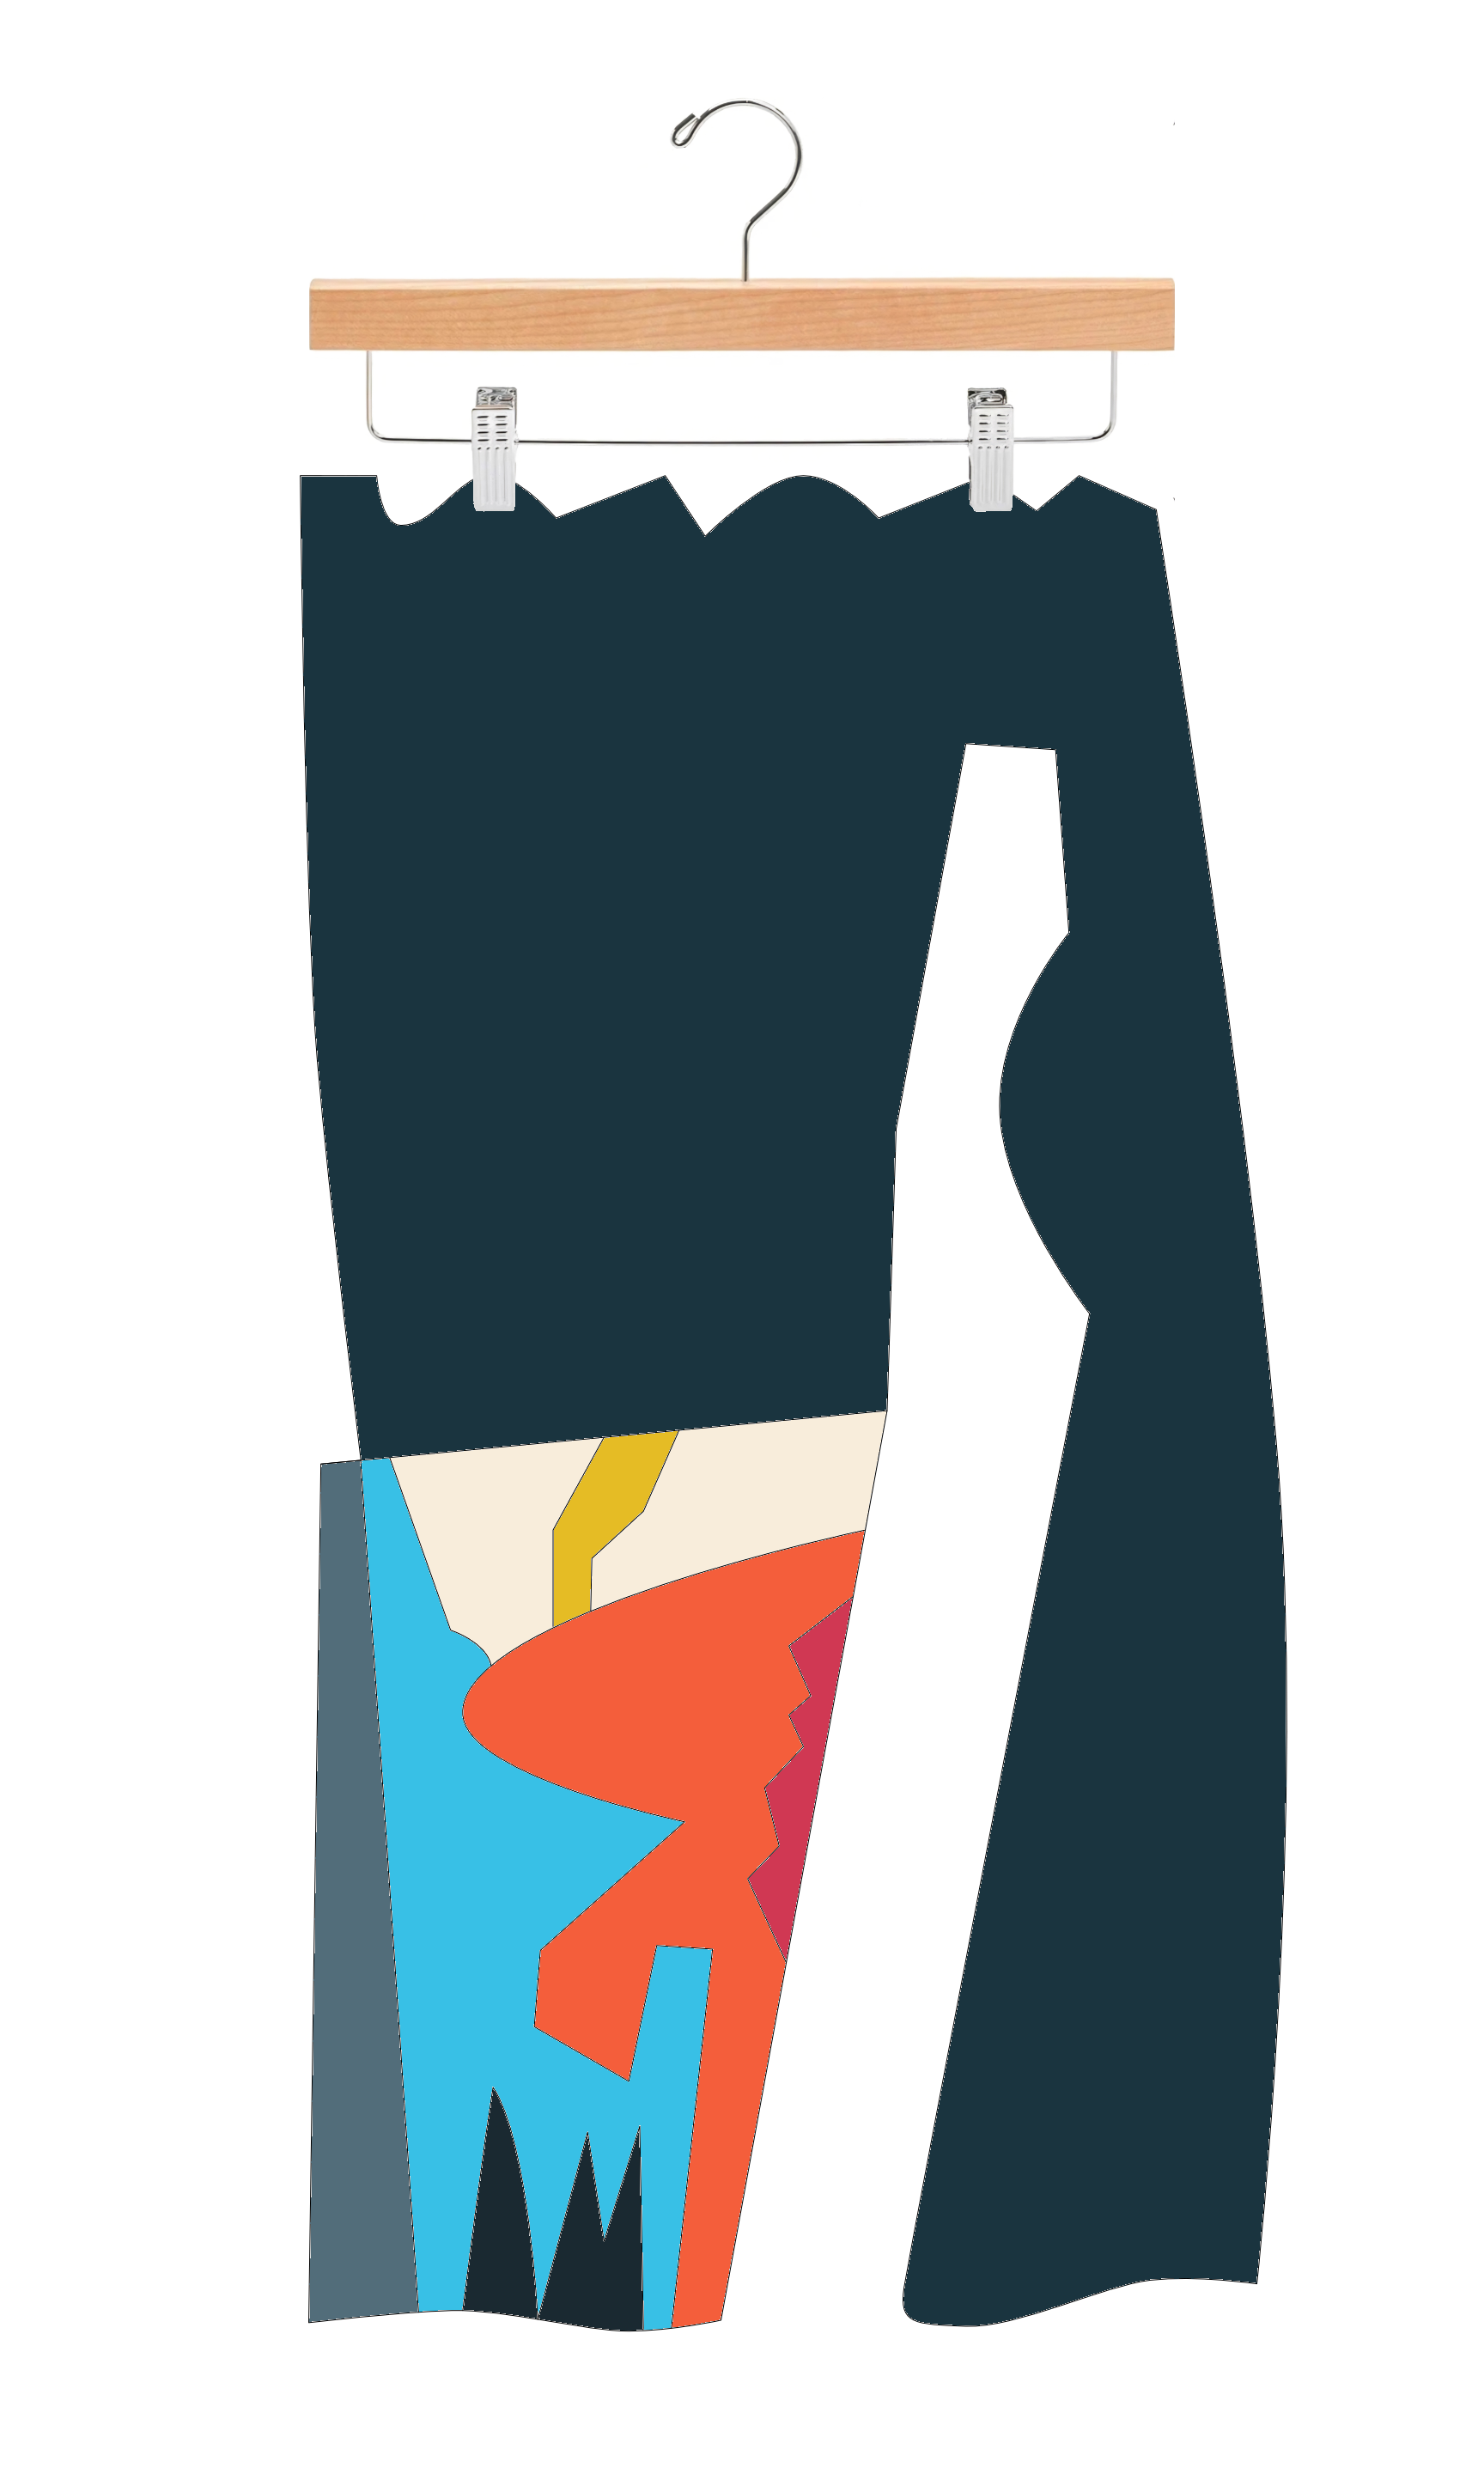
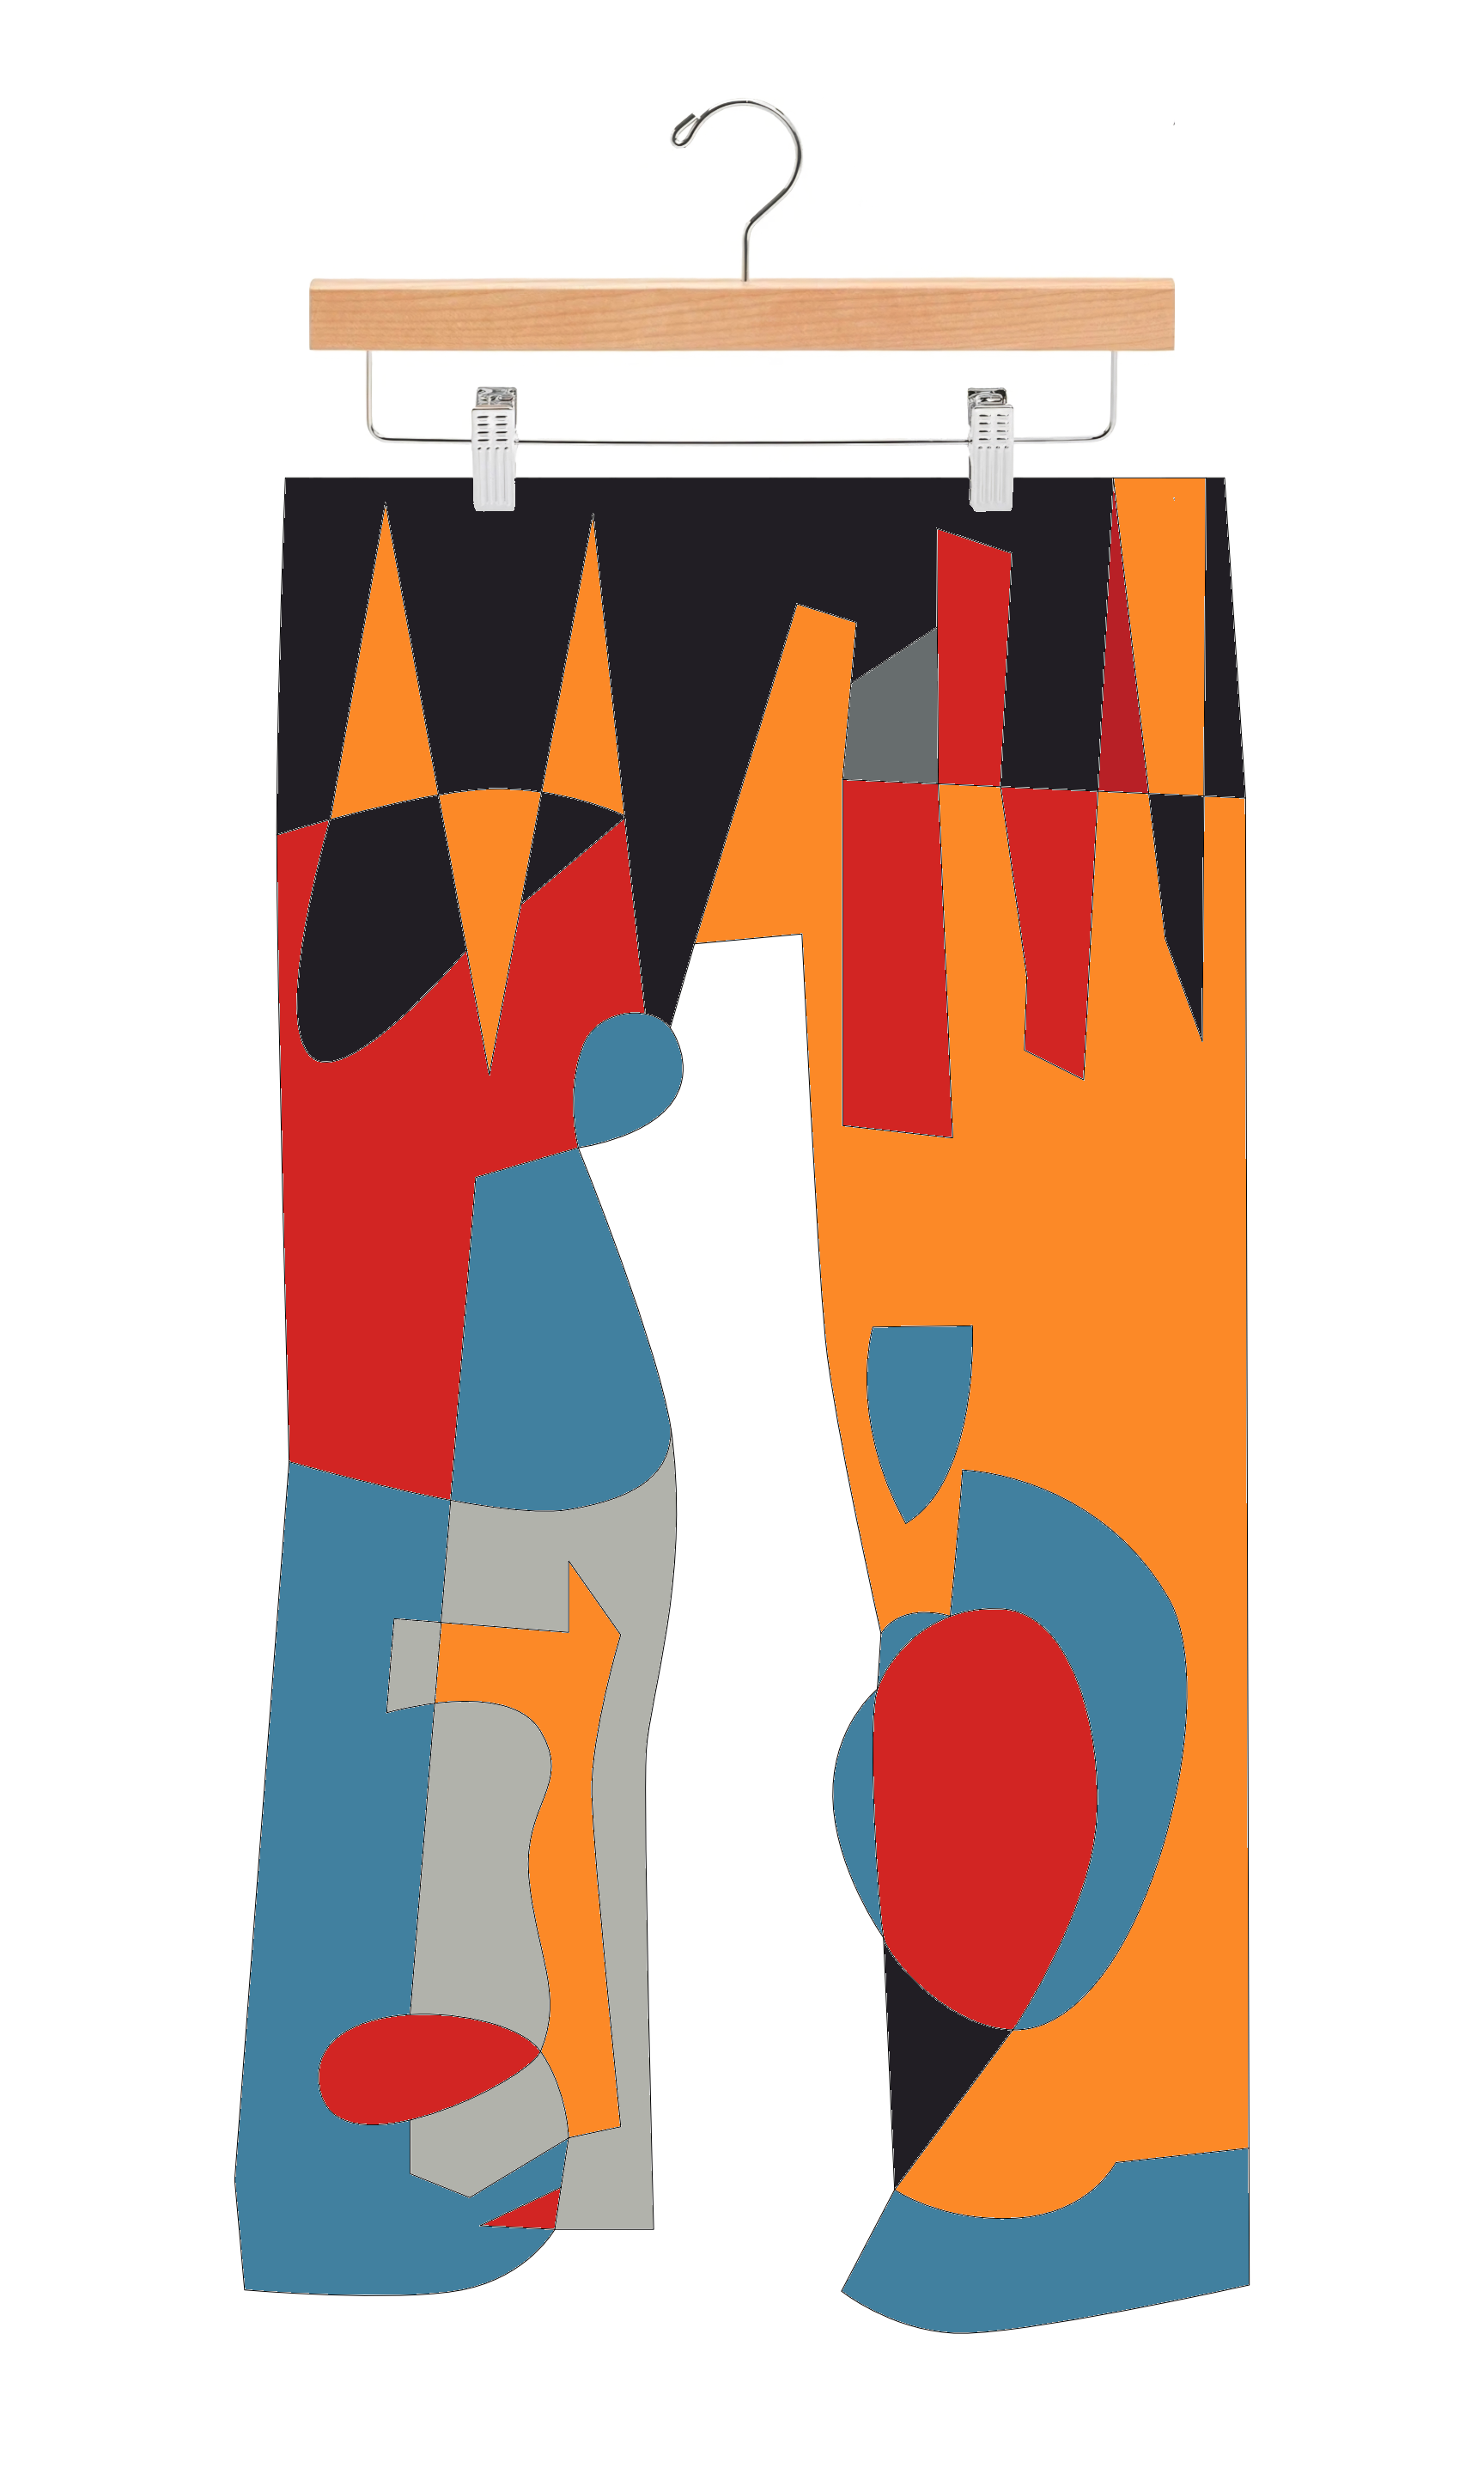
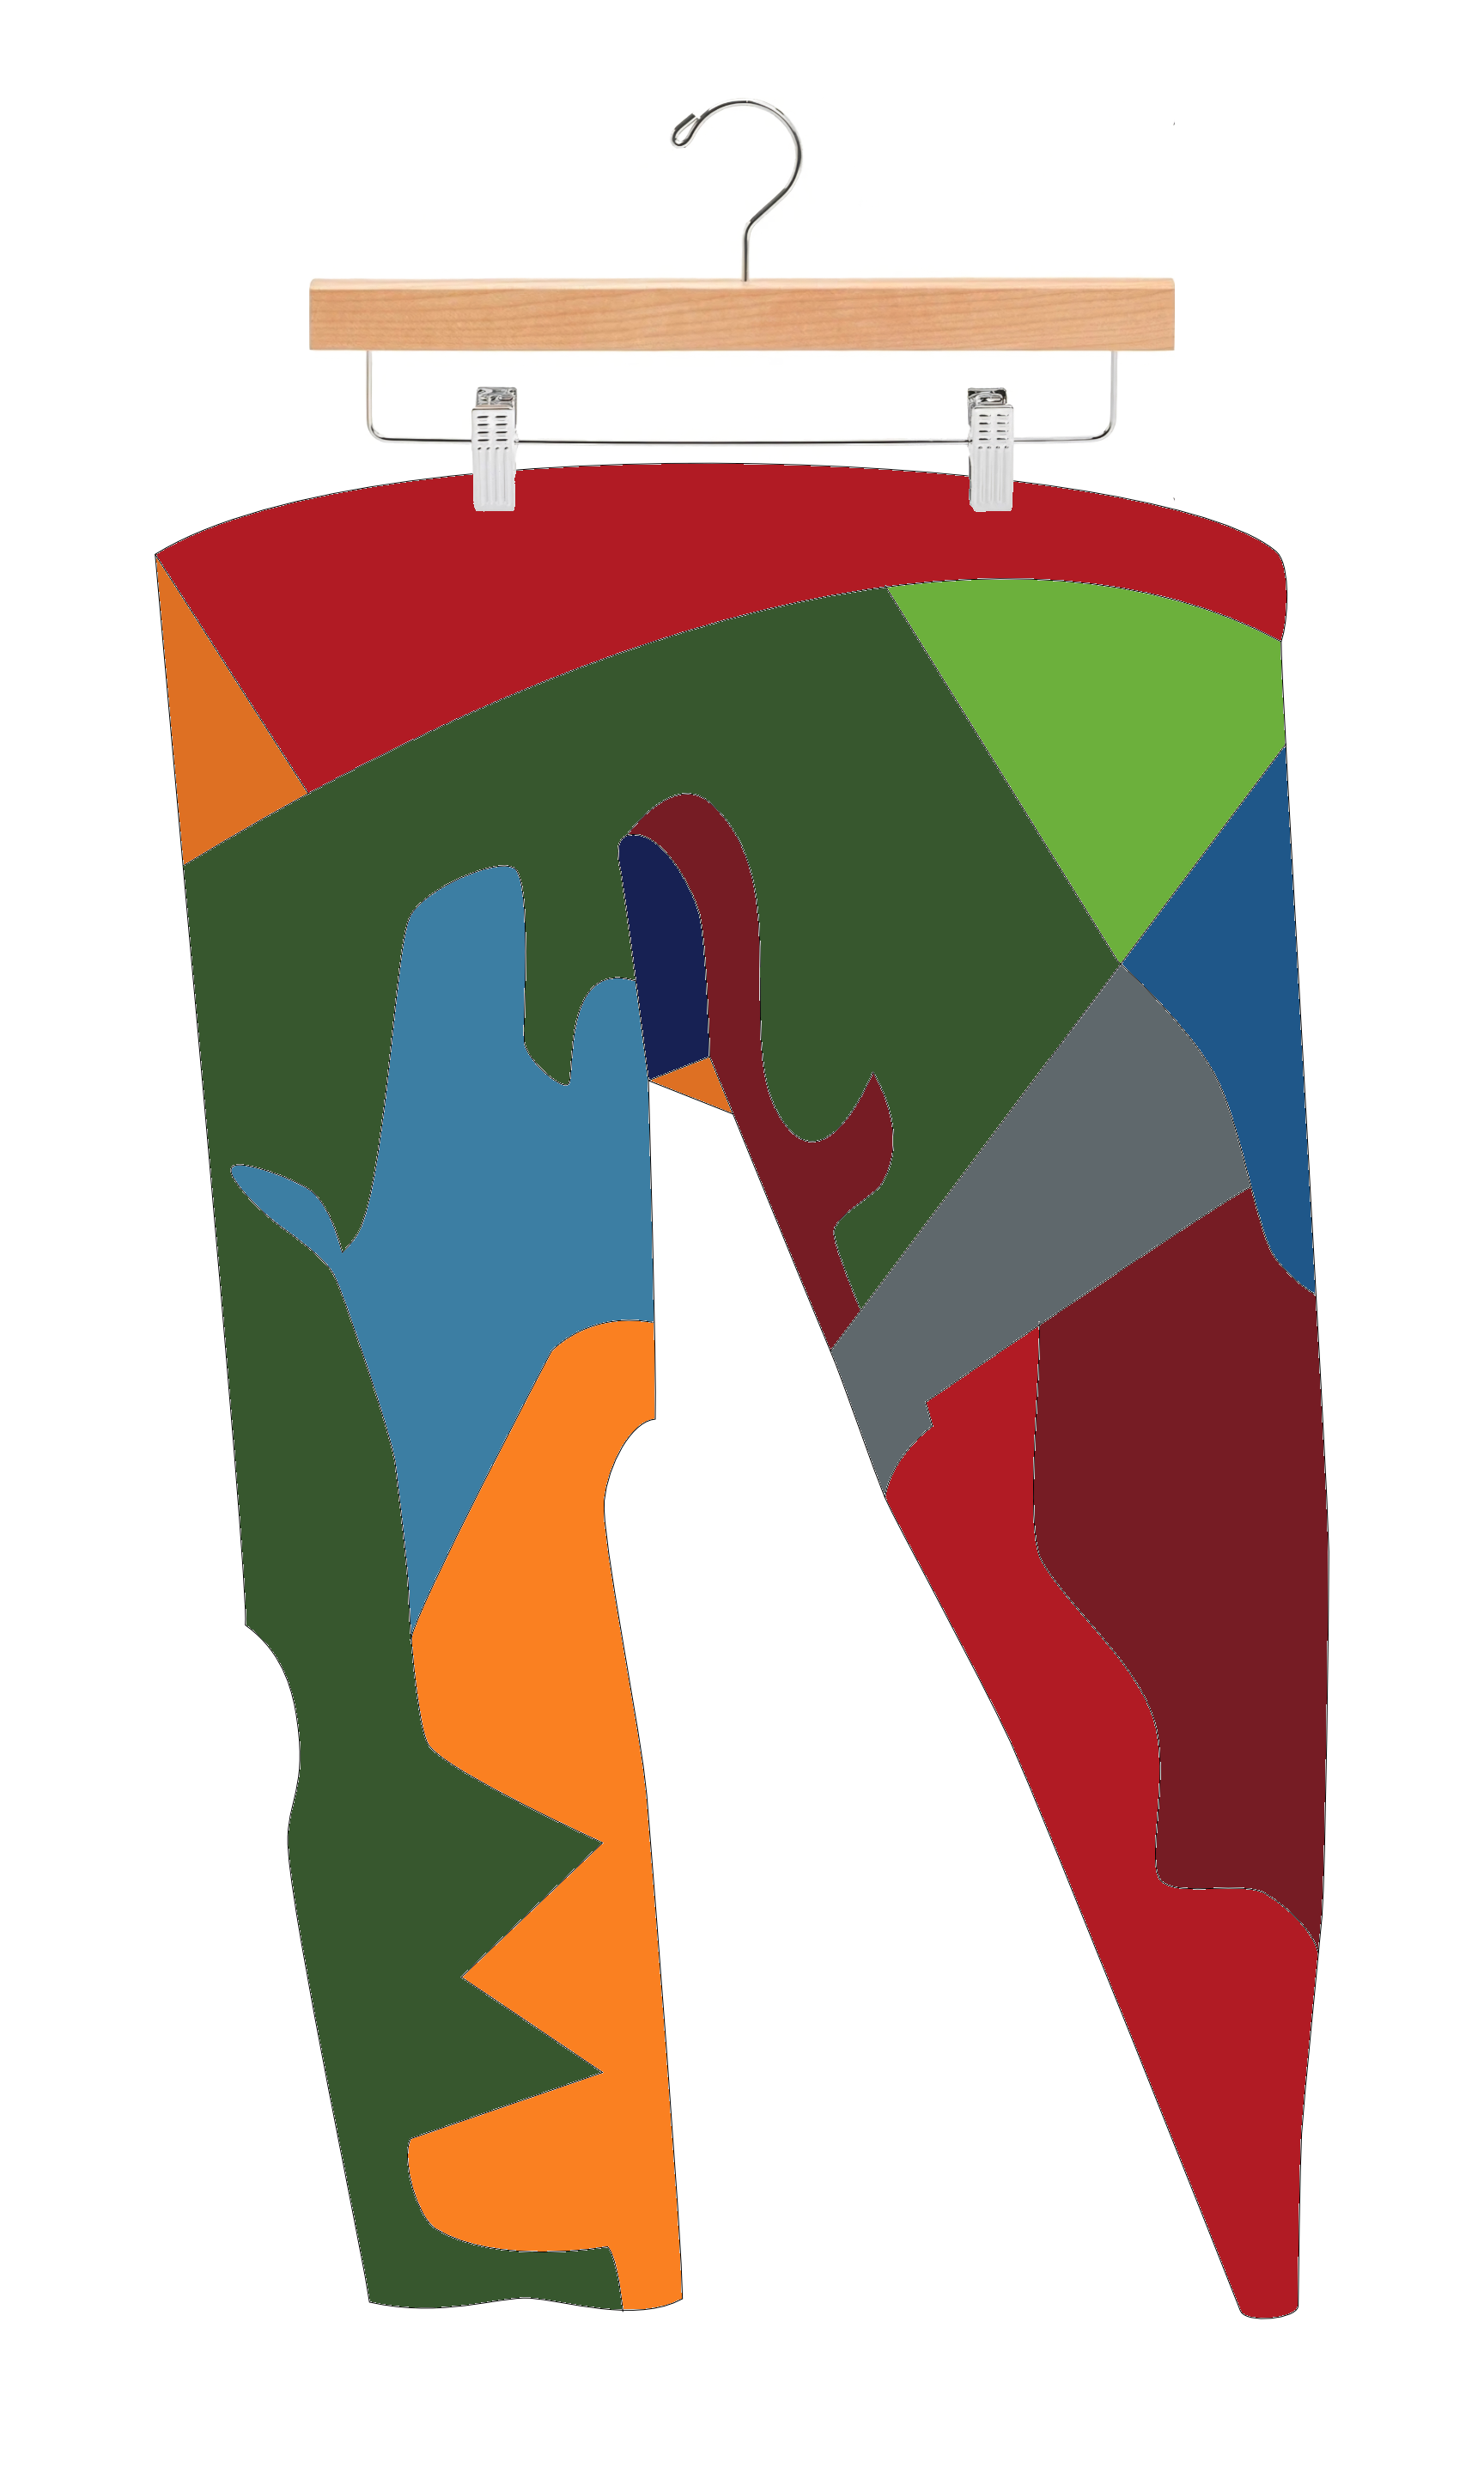
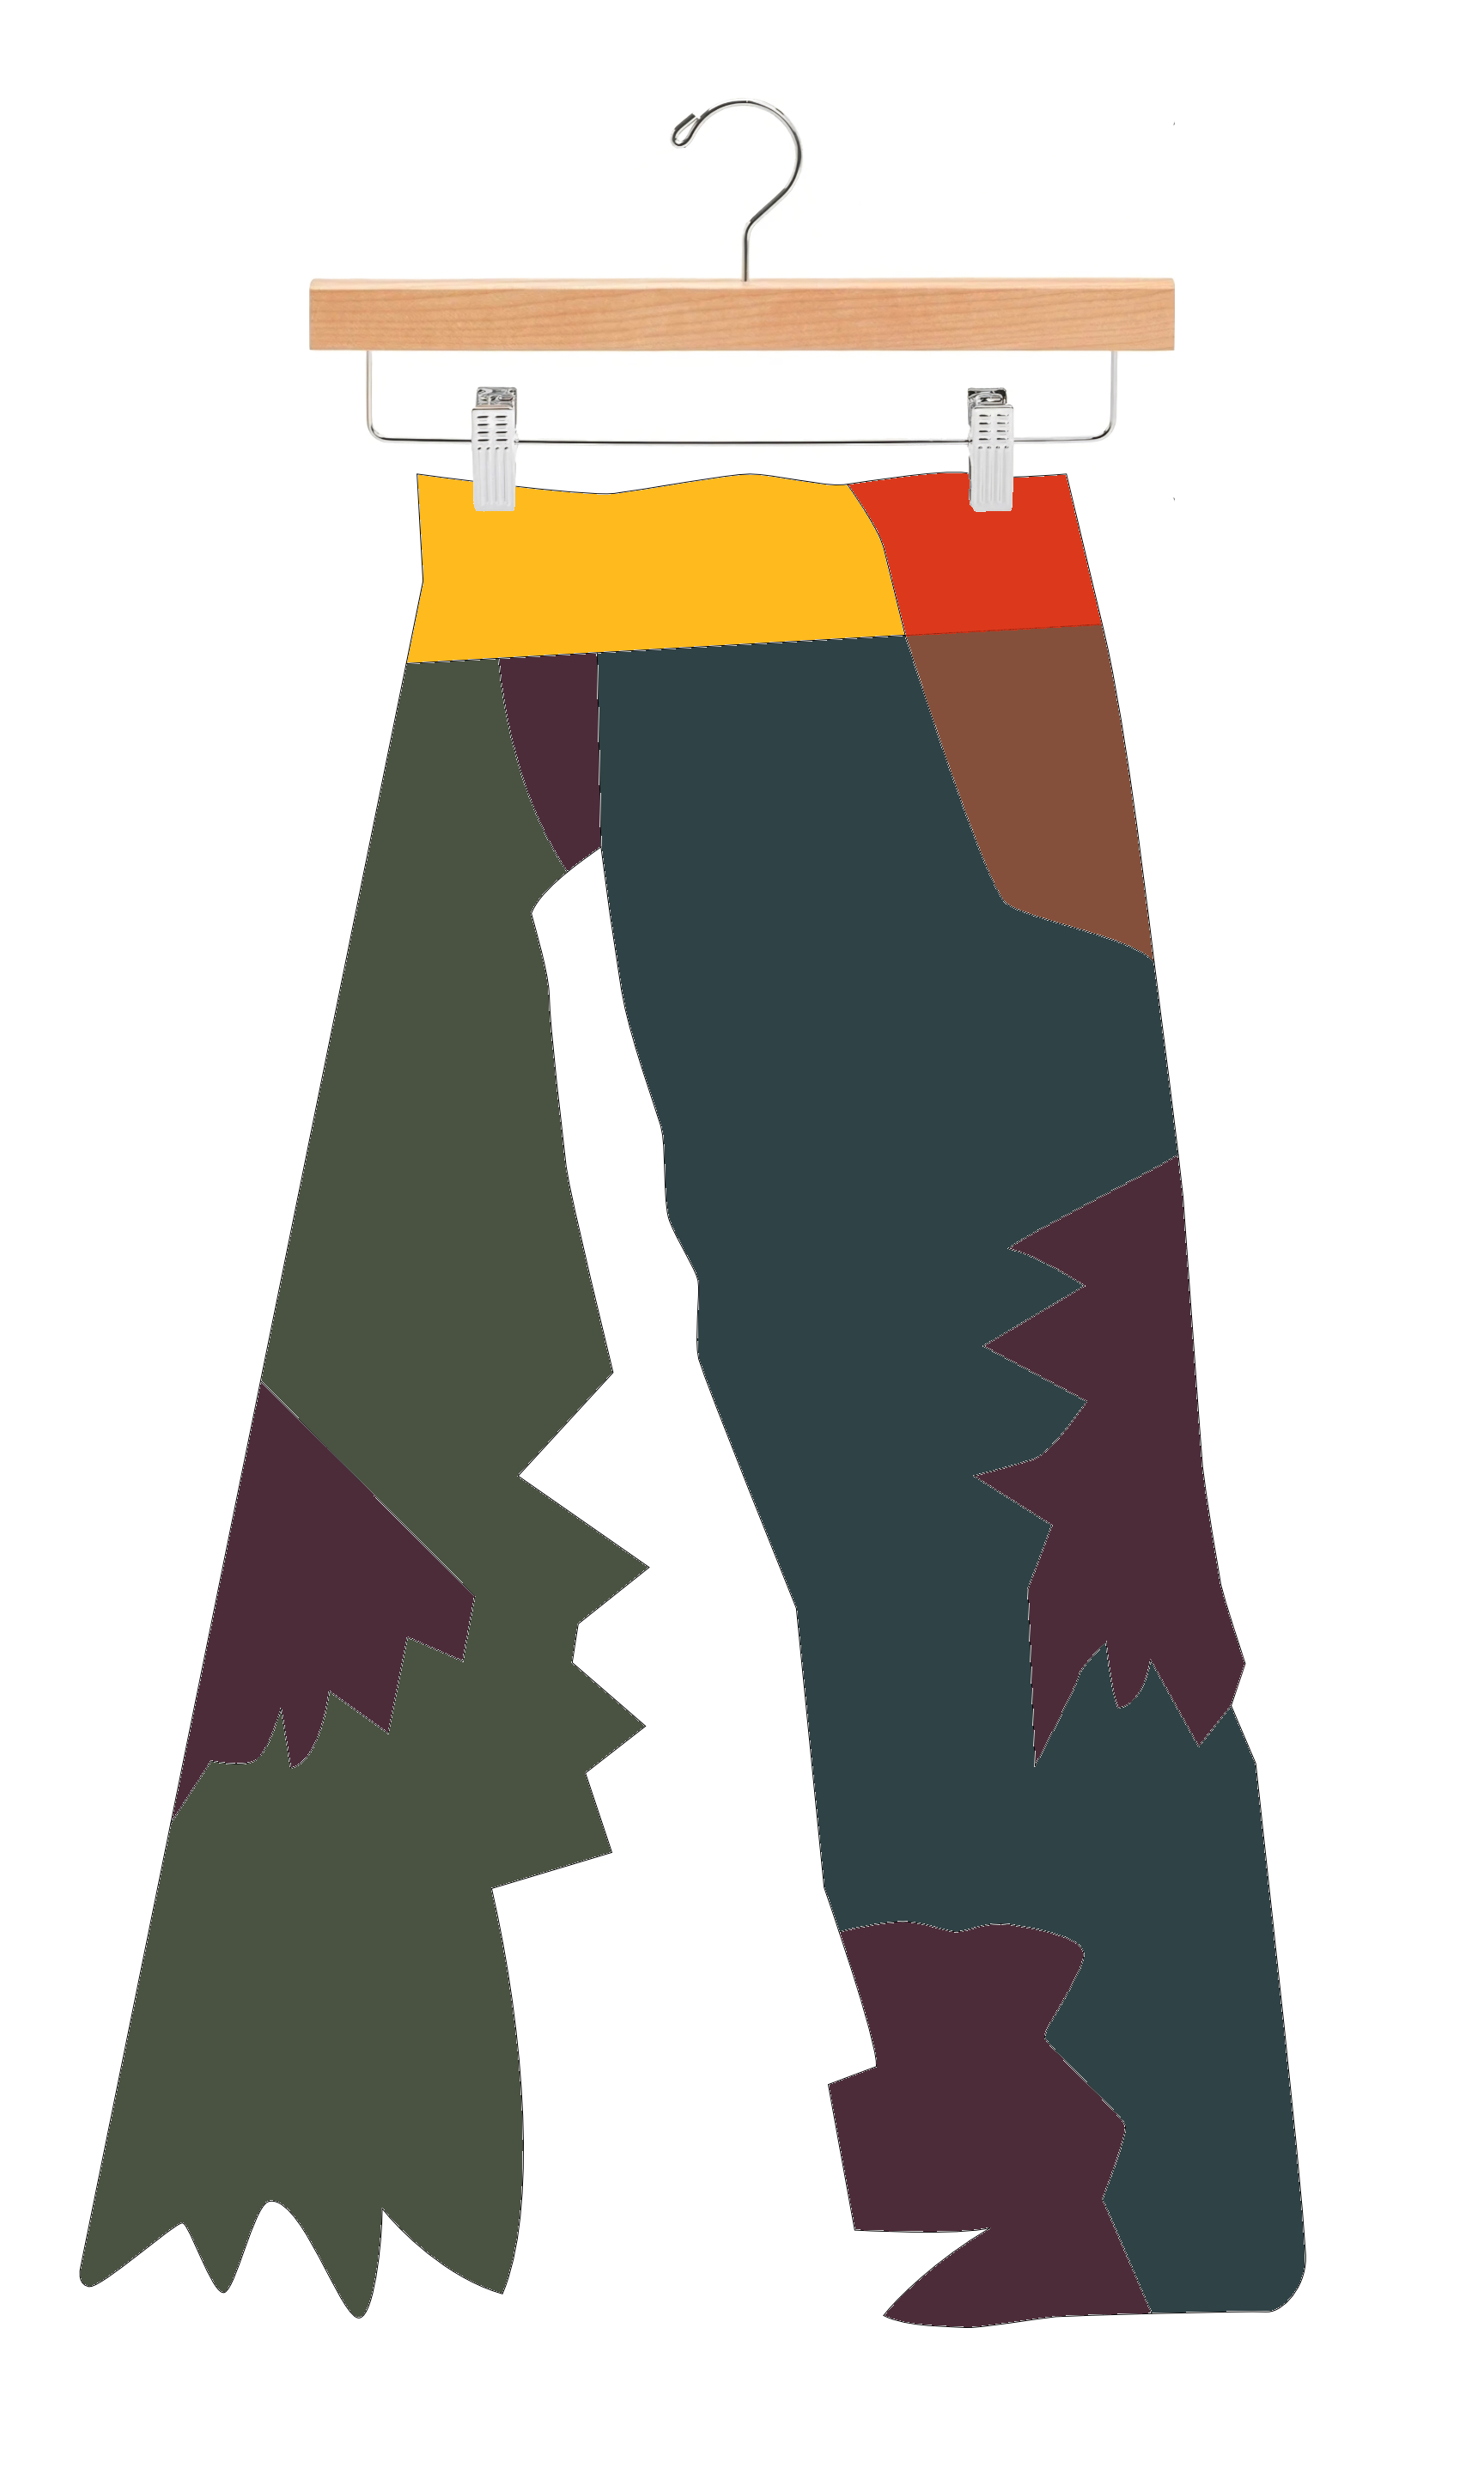
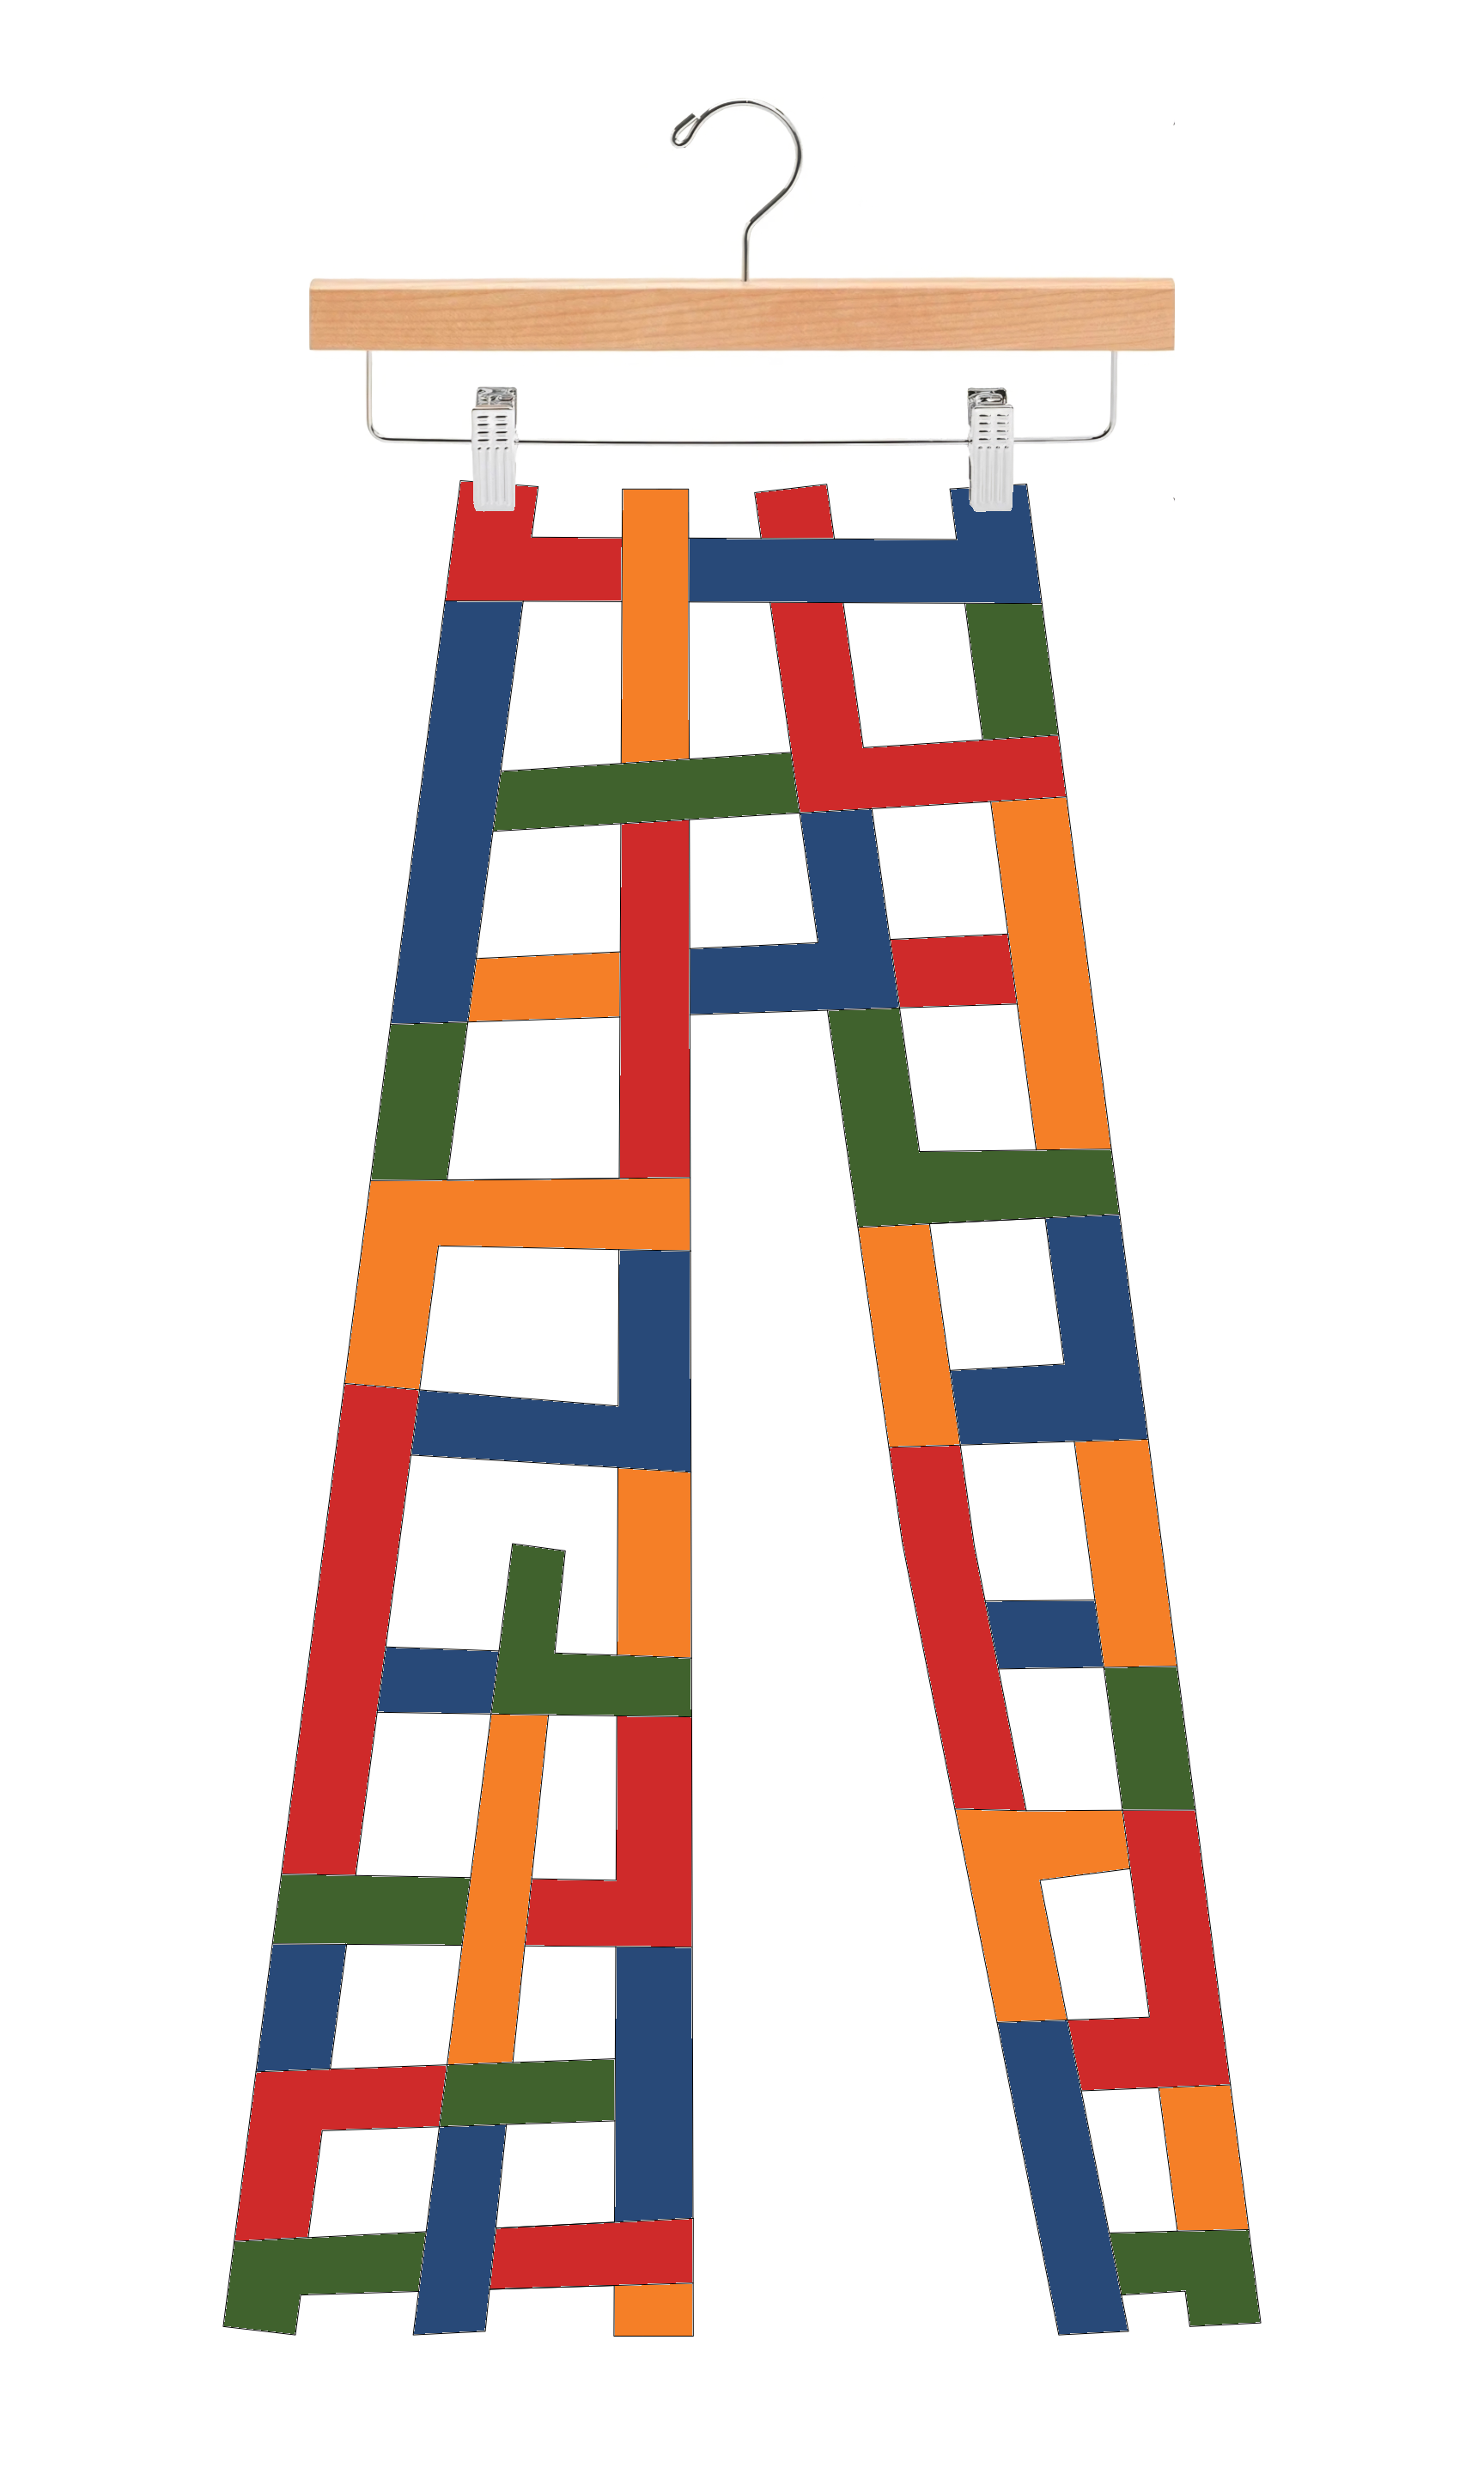
I have brought the Trouser series back out of obscurity. I selected 21 of the best trouser drawings from the Small Studies project and created outlines of each one using Affinity Designer 2. Each outline is 30 inches in length. The width of each one varies.
The ideas is to cut the outside shape and paint the patterns and textures inside with acrylic paint. I haven’t decided whether to laser cut or use a CNC device to cut the shapes.

This is an image exported from Affinity Designer showing all 21 trouser outlines.
The slide show below shows a few concept illustrations of what they may look like. They would be cut from either 1/4 inch or 1/2 inch top quality plywood.
I was going to add descriptive captions to these image but am leaving them as is for the time being. I did add captions but after all the work spent they ended up disappearing when I tried to add an additional image using the mobile app. This has happened a couple of time previously and it is very aggravating to have all that work end up missing. Maybe I will come back when I have the energy and add captions.
Anyway here is a peek at what I have been working on that will go into a couple of assemblage pieces I am working on.


Here is one of my experimental wire pieces I did back in 2010. I used Inkscape an open source vector design app to design and produce the template for drilling the holes for the red tie wires to fit through. I used a hand drill to carefully drill the holes through the template that was printed on an inkjet printer then taped to the piece of 1/2 inch thick plywood. The black multiple wire cable is some I purchased along with the red single strand wire from a DIY store. The diagonally placed stick anchored to the panel with black uncoated wire and end with the blue pointed end attached using two nails is a tree twig.
I only created one other larger piece like this using red and wires. I count them as failed experiments that no one has much interest besides me. I have a couple of ideas using this style that I have put on hold indefinitely.
I don’t really like the title I originally gave this one but can’t seem to come up with one more suitable.

This is my trusty Art Deco spoon that I use for dishing up paint when mixing and mixing Durham’s Rock Hard Putty. It is the only spoon I own in my art tool box.

Stainless steel table spoon with what looks to me like an Art Deco design.
I use these tiny nails now and then. I purchased them over 25 years ago from a craft store in Salt Lake City that is no longer in business. I still have a few of them left. There are more of the pewter color than the gold color left.

These tiny nails measure 6 mm (about 1/4 inch) in length.
I have been using Google Keep for several years to record titles and details of ideas as they come to me any time of the day. Sometimes they hit me late at night while I'm trying to fall asleep or back to sleep after waking at odd hours and find myself coming up with ideas.
I keep them in small groups and am up to #21 which I just started this morning. This year I began adding dates to sections.

Another one where the idea came quickly to me.

After being bottled up for so long behind a disposable low-hung curtain, he finally manages to rise above it to introduce his newest and easiest nosy balancing act.
Wood, acrylic paint, fabric, paper, wire, nails
11 x 7.75 x 3.5 inches (28 x 19.7 x 9 cm)
March 2024
This may be the first of several counting house pieces. The little hand pieces were designed using Affinity Designer then individual pieces were cut with a Cricut machine from card stock. I glued four of each of the hands together to make a sturdy thicker piece which were then painted first with white paint then several coats of yellow paint. The tiny books are made from pieces of wood covered with heavy paper then painted. I used an extra tiny chair leftover from the dripping yellow chairs piece and made this one dripping blue.

It was new and improved, but now this bona fide A-1 expendable counting house seeks new management.
Wood, acrylic paint, paper, found object, fishing tackle, paint transfer | 16 x 6 x 3.5 inches (40.6 x 15.2 x 8.9 cm) | March 2024
I use wood glue most of the time but when I want to make sure objects are held firmly in place, especially small objects, I use epoxy. I have used several brands of epoxy over the years and this is by far my favorite. It is easy to dispense and mix.

I don’t do very many free standing sculptures. I started working on this one sometime in 2023 and got stuck on what to do with it once I got the base and branch put together so it sat on one of the studio counters until a couple of weeks ago when the solution suddenly came to me one evening.

The magnificent Purpur cat with the big face and green-tipped tail dreams of a push-pop lift. | Wood, acrylic paint, wire | 17.25 x 4.75 x 4.75 in (43.8 x 12 x 12 cm) | March 2024

The yellow painted pole is from some broken branches I found from after a wind storm. While it was still fresh I pealed the bark from it. The green broken seat and section the cat and sofa sit on are made from pieces of quarter inch square pine dowel glued together.

A dripping paint jar made from a wooden craft piece I picked up from a hobby store. The floor of the base is a piece of MDF that I had used to mix some paint in a hurry.

I created the face in Affinity Designer and used the paint transfer technique to apply it to the cat. I used some old copper wire for the tail and to attach the head to the body. I used some thin wire I found on a street to make the ears.

To make sure this piece of the assemblage stays securely in place I drilled some hole in the bottom of the sofa legs and cut the heads off four small nails which are glued into the holes with epoxy. After the epoxy sets up I will push the sofa gently in position to mark the location I want the sofa to be placed. I then will drill some holes for the nail points to be placed in with epoxy. Because there isn’t much gluing surface on the bottom of the tiny legs the nails add some extra holding strength.
I have been using this trusty pin vise for several decades to drill tiny holes by hand in tight spots where my cordless drill won’t fit into. I use it quite a bit to drill pilot holes for eye screws when installing hanging wire on my art pieces. I have a few bits that are the width of straight pins and smaller.

Here I am drilling holes in a base to which a small chair will be attached. I added a piece of green Frog Tape to the bit to serve as a depth gauge so the holes will be the same depth. Crude but effective and simple.
I wasn’t sure how this one was going end up when I came up with the idea of doing a tower of pats of butter. I started working on it near the end of 2023 and it sat derelict in a corner of the studio until the end of February 2024. After I started working on the pats of butter again the idea came to me suddenly to make a mini m-house to go on the top of the tower. This is the smallest m-house of the four I have built.
The floor that the slice of bread is resting on is a piece of MDF that I used to help get clean cuts with my hand saw and miter box. I carved the hanging light bulb from a piece of round dowel. The wall socket was made using the paint transfer method with a tiny picture that was laser printed. The little yellow pencil was made from a dowel with words paint transferred on the side.

Atop the butter pats tower, mini m-house discovers one of those sensational moldy ones.
Wood, acrylic paint, paper, wire, paint transfer
13 x 5.75 x 3.5-inches (33 x 14.6 x 8.9-cm)
March 2024